
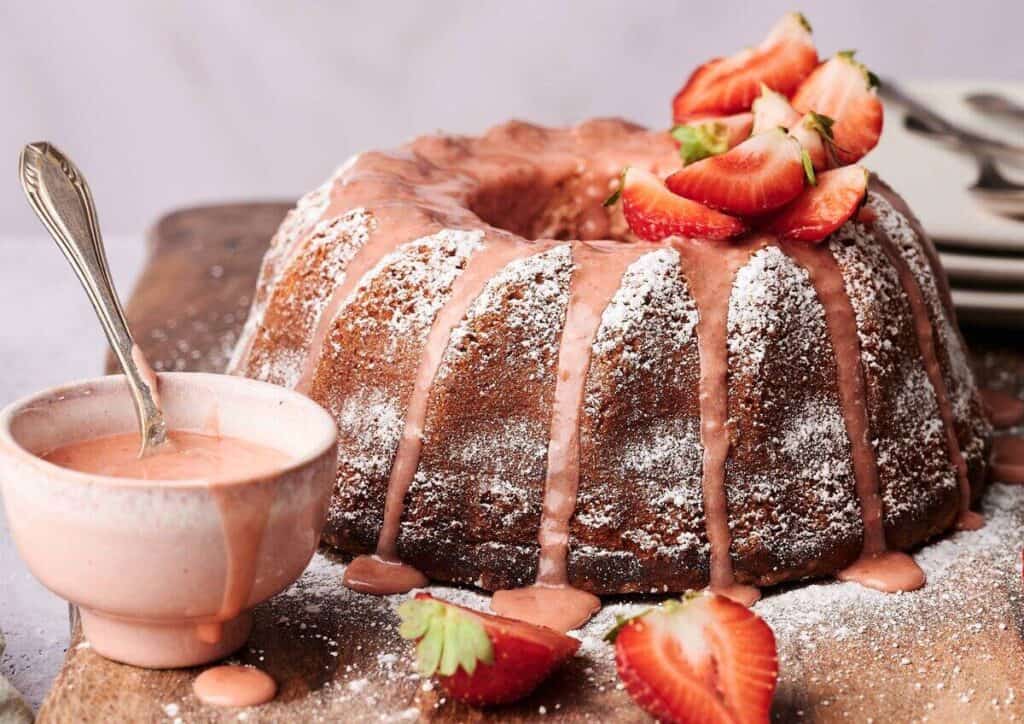
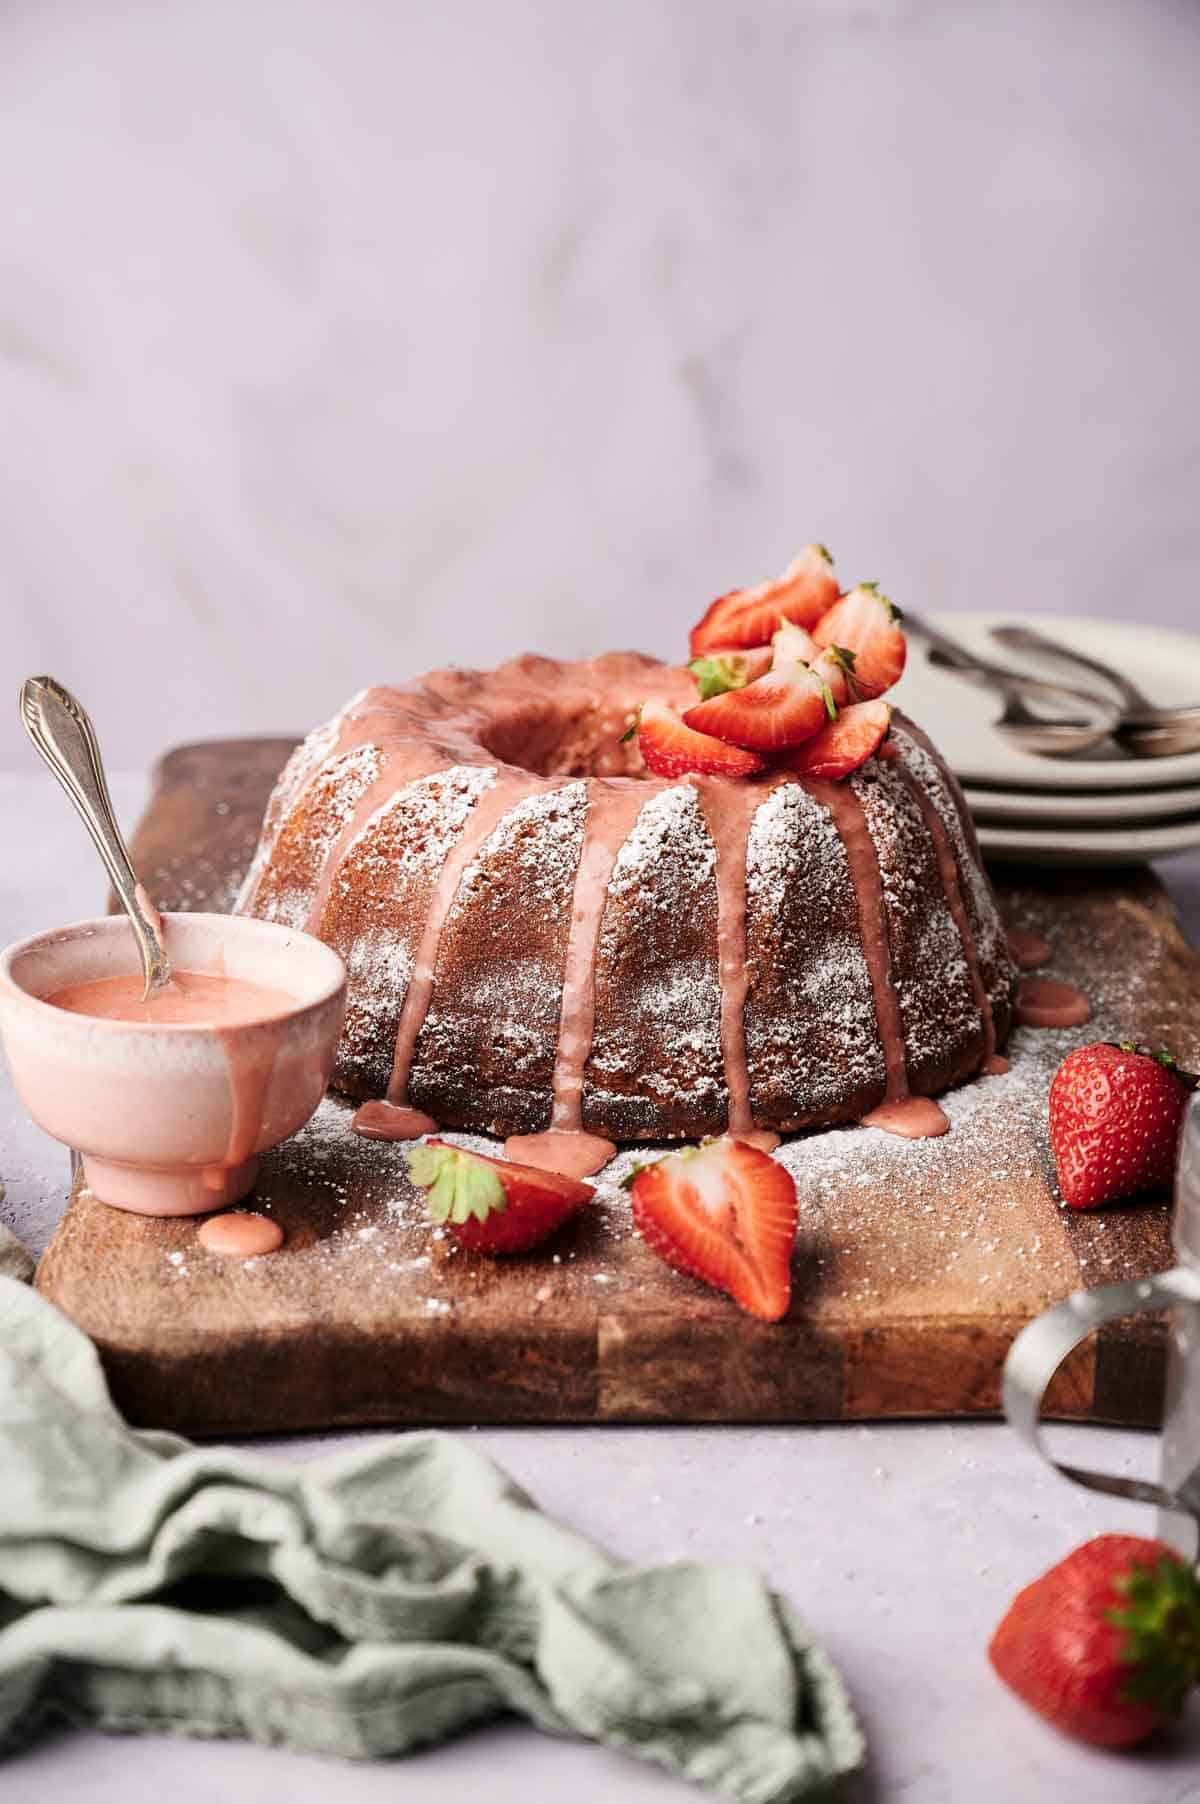
Strawberry Pound Cake

Strawberry Pound Cake is what I bake when I want something that feels like a treat but doesn’t take a ton of effort. It’s buttery, fruity, and fills the kitchen with a smell that draws everyone in. The strawberry flavor stands out more than most people expect. There’s a small step that makes a huge difference.
This post contains affiliate links. As an Amazon Affiliate, if you purchase through those links, I earn a commission. Thank you!
I bring this Strawberry Pound Cake to family dinners or gatherings because it’s reliable, easy to pack, and always gets finished. I’ve prepped it the night before and stored it in the fridge without any issues. It also freezes well, allowing you to save a few slices for later.
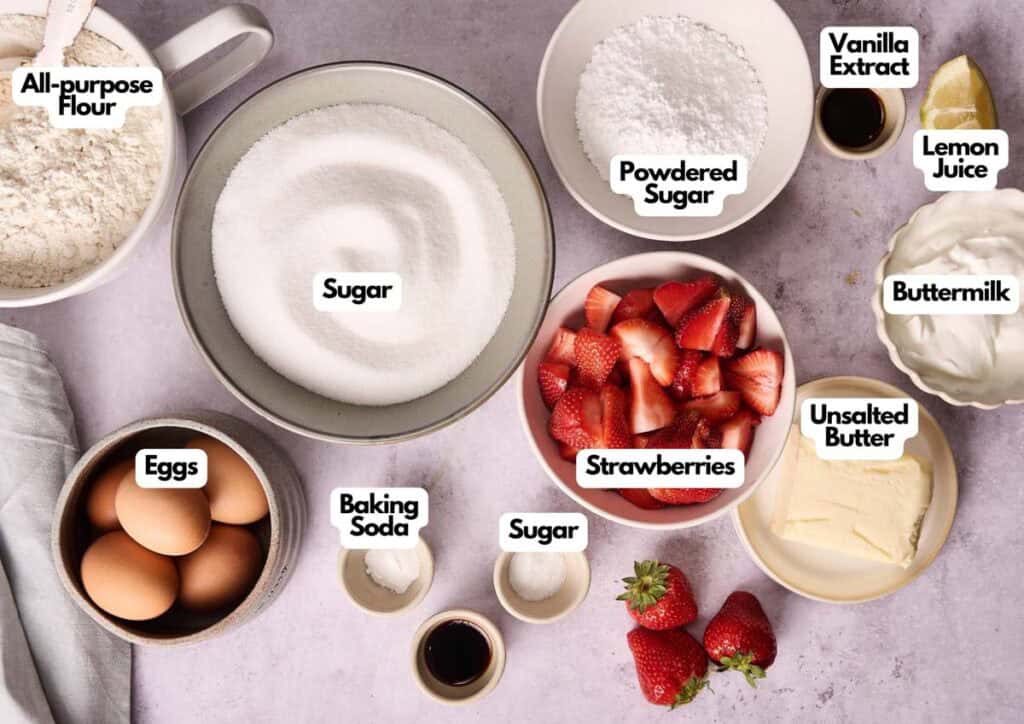
Ingredients You’ll Need
You’ll need all the ingredients shown in the photograph below.
How to Make Strawberry Pound Cake with Step-By-Step Instructions
Scroll down for the full recipe card containing a full printable recipe and measurements in both US customary and metric units.
You’ll find this recipe easy to follow if you stick to my simple instructions below. It’s all about layering flavor and getting the bake just right.
Purée Strawberries
Place the hulled strawberries in a food processor or high-speed blender and blend so they are smooth. If you’re prepping a lot of berries, I like using this strawberry huller to quickly remove the tops without wasting any fruit.
Before I put them in my mini food processor, which handles the job well and is simple to clean afterward, a high-speed blender is also a solid choice, especially if you’re working with a larger batch and want everything nicely processed.
Reserve 2 tablespoons of the purée and set it aside for the glaze.
Reduce the Strawberry Purée
Pour the remaining purée into a small saucepan and simmer over medium heat for 15 to 20 minutes, stirring occasionally, until thickened and reduced to about ½ cup. This nonstick saucepan is the perfect size for reducing fruit without burning or splattering.
Let it cool completely so it doesn’t affect the texture of the batter.
SERIOUSLY GOOD
DESSERTS!
Dessert First is a collection of 61 RECIPES to show you that you can make beautiful, impressive desserts right in your own kitchen, no matter your skill level.
Immediate eBook download. No physical book available.
∙ Lemon Pound Cake
∙ Starbucks Cake Pops
∙ Boston Cream Pie
∙ Chocolate Mousse
∙ Matcha Tiramisu
...and much more!
Includes ad-free recipes like:

Prepare the Oven and Pan
Preheat your oven to 325°F (165°C). Grease and flour a 12-cup Bundt pan thoroughly to prevent sticking. I always use a non-stick Bundt Pan here as the heavy cast aluminum gives a lovely bake and releases beautifully when appropriately greased.
Cream the Butter and Sugar
In a large mixing bowl, beat the butter for 2 minutes on high speed to achieve a creamy consistency. I love using stainless steel mixing bowls for prepping because they have a non-slip bottom that stays in place while I’m working.
Gradually stream in the sugar and beat for another 4 minutes, until it’s light and fluffy. For easier whisking without muscle strain, I use this 6-speed hand mixer since it effortlessly handles thick mixtures.
Add the Eggs
Mix in the eggs one at a time, making sure each is fully incorporated before adding the next. This keeps the batter stable and prevents curdling.
Scrape down the sides of the bowl as needed. I often reach for my silicone spatula for scraping every bit from the bowl without tearing anything.
Mix the Dry Ingredients
With the mixer on low speed, work in the flour in two batches, then sprinkle in the salt and baking soda. This flour sifter helps break up any lumps in the powder, making sure everything remains light.
Let everything come together just enough to form a soft mixture without overworking it.
Add the Wet Ingredients
Add the buttermilk, cooled strawberry reduction, and vanilla extract to achieve a smooth and evenly blended consistency.
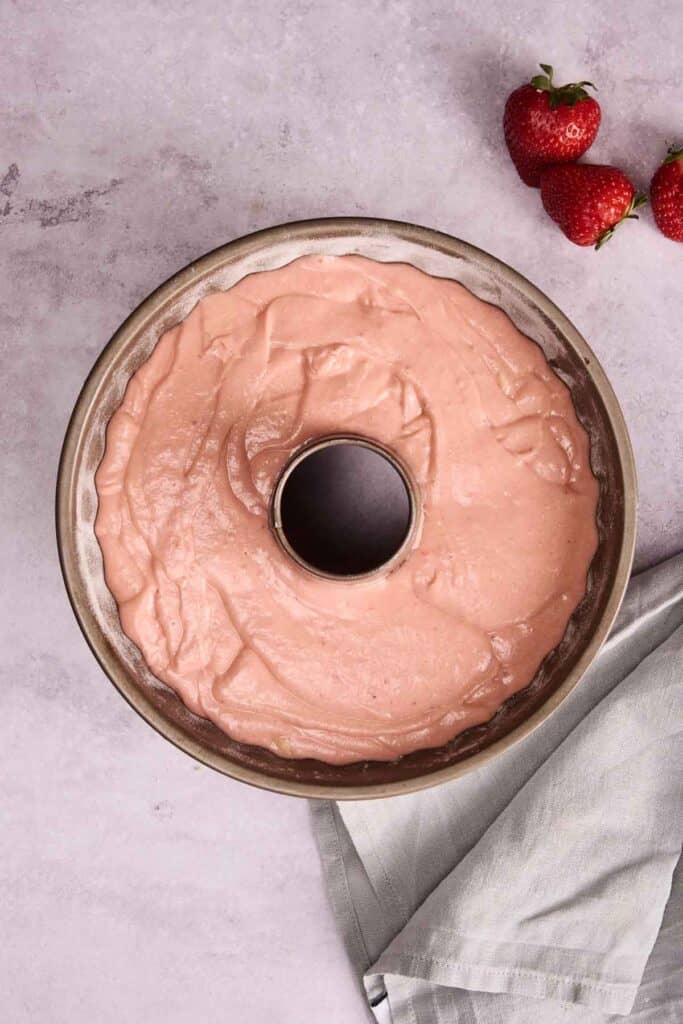
Bake the Cake
Pour the batter into the prepared pan and level the top. I love using an offset spatula; it’s easier to spread batter across the curved surfaces of a Bundt pan.
Bake for 70 to 80 minutes, or until a toothpick inserted in the center comes out clean, which means the inside is fully cooked. I keep a pack of these bamboo ones in my drawer for testing doneness without leaving big holes in the cake. This cake tester also works well and is easy to rinse and reuse between bakes.
Cool and Invert the Cake
Allow the cake to rest in the pan for 10 minutes, then carefully invert it onto a wire rack or serving platter. I often reach for my nonstick cooling rack, which is sturdy and prevents soggy bottoms.
When I’m plating for guests, I use a ceramic serving platter that’s stable to carry and looks great on the table. Give it time to cool completely before adding the strawberry glaze, so it settles neatly over the surface.
Make the Glaze
In a small bowl, whisk together the reserved strawberry purée, powdered sugar, vanilla extract, and lemon juice until silky and pourable. These ceramic ramekins are great for keeping glaze ingredients measured and ready.
Serve the Cake
Drizzle the cooled cake with the glaze and let it set before serving. Serve and enjoy with fresh berries or a dollop of whipped cream.
If you’re bringing this to a gathering, pack it in a round container like this one so it doesn’t shift or get damaged during the ride. To keep it cool along the way, slide the whole container into this round insulated carrier, which holds temperature well without tipping or taking up too much space.
Equipment
Ingredients
For the Cake:
- 2½ cups fresh strawberries hulled
- 1 cup unsalted butter at room temperature
- 3 cups granulated sugar
- 5 large eggs at room temperature
- 3 cups all-purpose flour
- 1 teaspoon salt
- ½ teaspoon baking soda
- 1 cup buttermilk
- 1 teaspoon vanilla extract
For the Glaze:
- 2 tablespoons strawberry purée reserved from cake prep
- 2 cups powdered sugar
- 1 teaspoon vanilla extract
- 1 teaspoon lemon juice

Video
Instructions
- Place the strawberries in a food processor or high-speed blender and purée until smooth. Reserve 2 tablespoons of the purée for the glaze.2½ cups fresh strawberries
- Pour the remaining purée into a small saucepan and simmer over medium heat for 15–20 minutes, stirring occasionally, until reduced to about ½ cup and thickened. Set aside to cool completely.
- Preheat your oven to 325°F (165°C). Generously grease and flour a 12-cup Bundt pan.
- In a large mixing bowl, beat the butter on high speed for 2 minutes, until creamy. Gradually add the sugar and continue beating for 4 minutes, until the mixture is pale and fluffy. Add the eggs one at a time, mixing well after each addition and scraping down the bowl as needed.1 cup unsalted butter, 3 cups granulated sugar, 5 large eggs
- Reduce the mixer speed to low. Add the flour in two batches, followed by the salt and baking soda. Mix until just combined—do not overmix.3 cups all-purpose flour, 1 teaspoon salt, ½ teaspoon baking soda
- Add the buttermilk, cooled strawberry purée, and vanilla extract. Stir until the batter is smooth and fully combined.1 cup buttermilk, 1 teaspoon vanilla extract
- Pour the batter into the prepared Bundt pan and smooth the top. Bake for 70–80 minutes, or until a toothpick inserted into the center comes out clean.
- Let the cake cool in the pan for 10 minutes, then carefully invert onto a wire rack or serving platter. Allow to cool completely before glazing.
- In a small bowl, whisk together the reserved 2 tablespoons of strawberry purée, powdered sugar, vanilla extract, and lemon juice until smooth and pourable.2 tablespoons strawberry purée, 2 cups powdered sugar, 1 teaspoon vanilla extract, 1 teaspoon lemon juice
- Once the cake is fully cooled, drizzle the glaze over the top. Let it set for a few minutes before slicing.
- Serve and enjoy with fresh berries or a dollop of whipped cream!
Notes
- Bold Strawberry Flavor: Reducing the purée concentrates the flavor without making the mixture too wet.
- Smooth Batter: Let your strawberry reduction cool thoroughly before adding it to avoid curdling the batter.
- No Sticking: Grease and flour every corner of your Bundt pan to ensure the cake releases cleanly from the pan.
- Room Temperature Ingredients: Use room-temperature butter and eggs so they blend more easily and evenly.
- Don’t Overmix: Once you add the dry ingredients, mix just until combined to keep the crumbs tender.
- Glaze Consistency: If the glaze is too thick, drizzle a few drops of lemon juice or milk to thin it slightly. As a trick, you can also add a hint of lemon zest to brighten the flavor without making it runnier.
- Cooling Time Matters: Let the cake rest completely before glazing or slicing to avoid a sticky mess.
Nutrition
SERIOUSLY GOOD
DESSERTS!
Dessert First is a collection of 61 RECIPES to show you that you can make beautiful, impressive desserts right in your own kitchen, no matter your skill level.
Immediate eBook download. No physical book available.
∙ Lemon Pound Cake
∙ Starbucks Cake Pops
∙ Boston Cream Pie
∙ Chocolate Mousse
∙ Matcha Tiramisu
...and much more!
Includes ad-free recipes like:
Recipe Notes and Expert Tips
I’ve tested this pound cake a few different ways. Here’s what I’ve learned to make sure yours turns out every time:
- Bold Strawberry Flavor: Reducing the purée concentrates the flavor without making the mixture too wet.
- Smooth Batter: Let your strawberry reduction cool thoroughly before adding it to avoid curdling the batter.
- No Sticking: Grease and flour every corner of your Bundt pan to ensure the cake releases cleanly from the pan.
- Room Temperature Ingredients: Use room-temperature butter and eggs so they blend more easily and evenly.
- Don’t Overmix: Once you add the dry ingredients, mix just until combined to keep the crumbs tender.
- Glaze Consistency: If the glaze is too thick, drizzle a few drops of lemon juice or milk to thin it slightly. As a trick, you can also add a hint of lemon zest to brighten the flavor without making it runnier.
- Cooling Time Matters: Let the cake rest completely before glazing or slicing to avoid a sticky mess.
How to Store Leftovers
Once cooled, store the cake covered at room temperature for up to 2 days or in the refrigerator for up to 5 days. I like using this glass airtight container to keep leftover slices fresh without drying them out. Let it sit at room temperature before serving if chilled.
You can also freeze individual slices by wrapping them tightly in plastic wrap and placing them in a container or freezer bag. I use plastic wrap with a slide cutter because it clings well and doesn’t tear or tangle.
Then, I place them in these freezer-safe containers when I want something sturdy that won’t crack in cold temps. If I want to save space, I put the wrapped slices in gallon-size freezer bags, which are great too since they seal well and stack flat to save space.
It freezes well for up to 2 months.
More Easy Recipes for You to Try at Home
I’ve got plenty more simple desserts and crowd-pleasing cakes if you’re in the mood to bake again soon.