
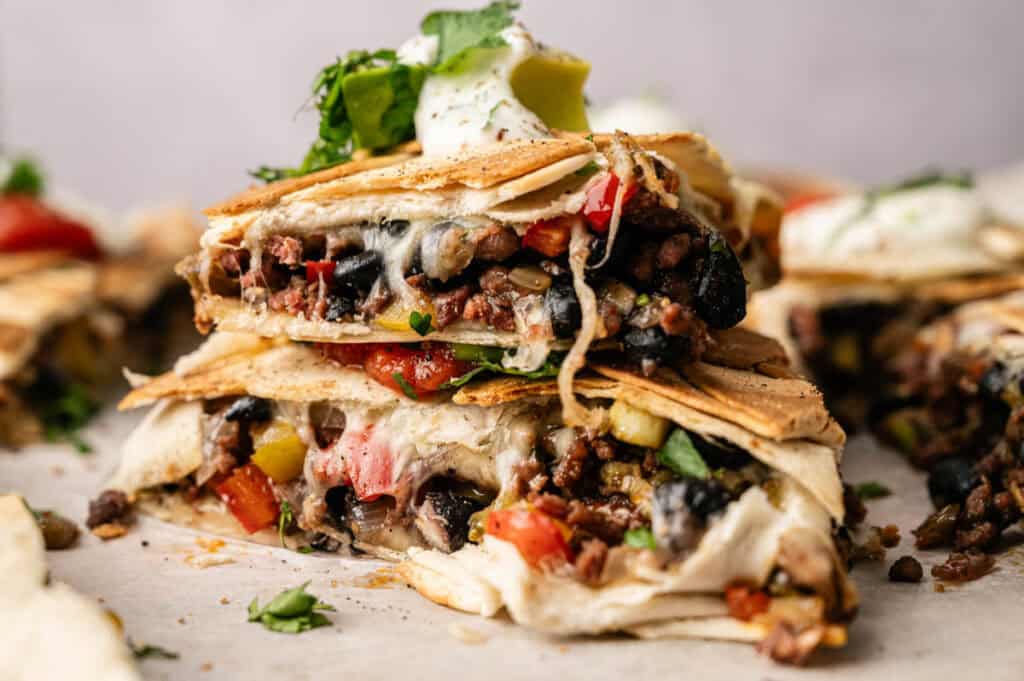
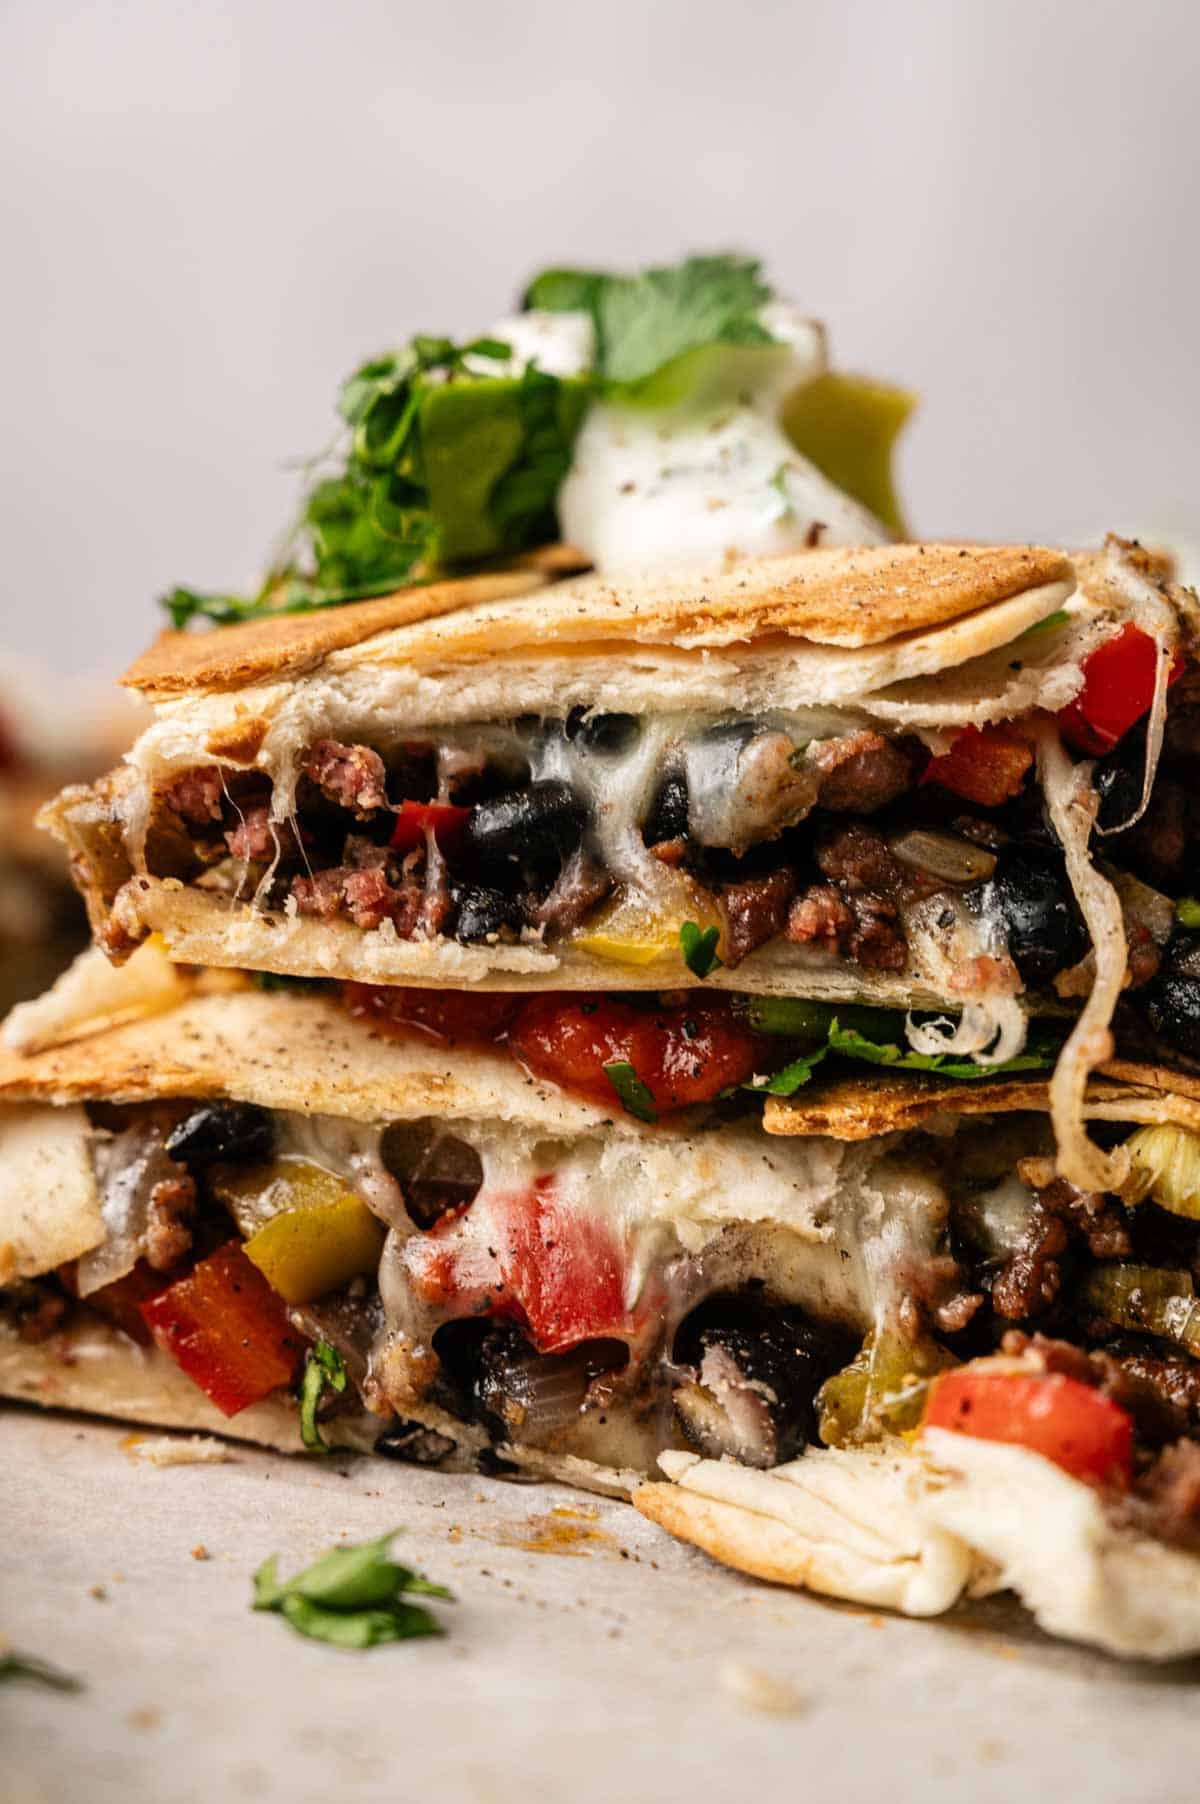
Sheet Pan Quesadillas

I reach for Sheet Pan Quesadillas when I need something cheesy and filling that feeds everyone at once. The tortillas turn golden and crunchy while Monterey Jack melts into every layer with seasoned beef, black beans, and peppers. You skip all that stovetop flipping and end up with cheesy quesadillas everyone actually wants.
This post contains affiliate links. As an Amazon Affiliate, if you purchase through those links, I earn a commission. Thank you!
If you love dinners that feed everyone without a pile of dishes, you’ll probably love my sheet pan recipes too. They’re the kind of no-fuss meals that make weeknights feel doable.
I make them for game day parties, family taco nights, potlucks, and Cinco de Mayo because they feed a crowd and everyone can grab a slice. They’re a total crowd-pleaser and way easier than making individual quesadillas on the stove. Store leftovers in the fridge for 3 days or freeze individual slices for up to 2 months.
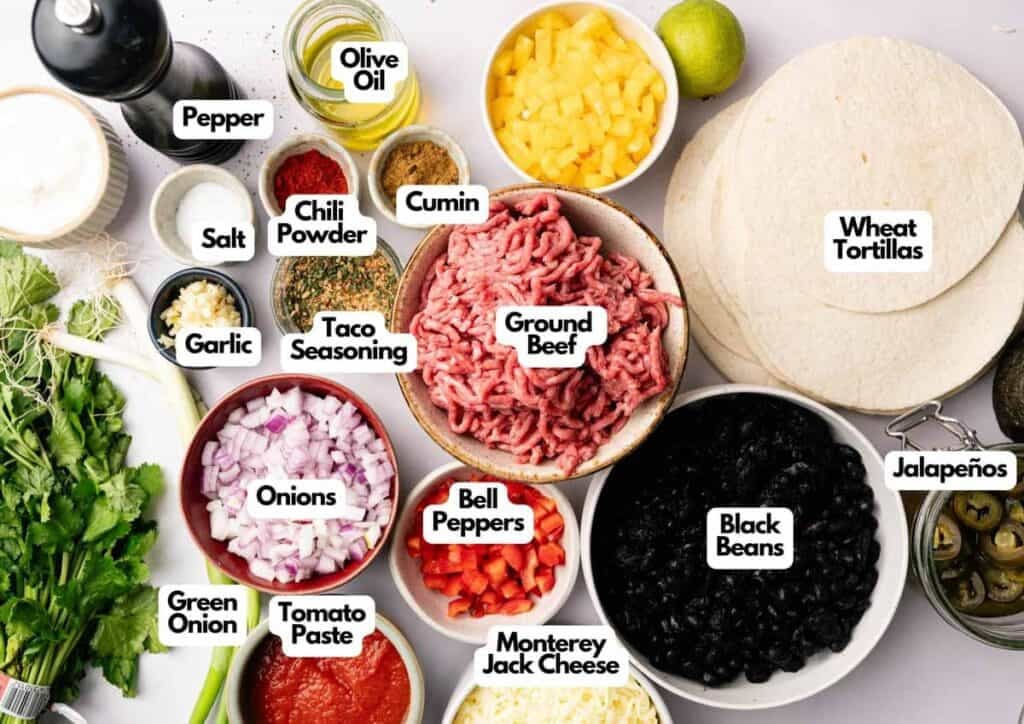
Ingredients You’ll Need
You’ll need all the ingredients shown in the photograph below.
How to Make Sheet Pan Quesadillas with Step-By-Step Instructions
Scroll down for the full recipe card containing a full printable recipe and measurements in both US customary and metric units.
You’ll have these sheet pan quesadillas ready in under an hour, and most of that time is hands-off baking.
Prep the Oven and Cook the Beef
Set your oven to 400°F so it’s ready when you need it. I like using this oven thermometer to make sure your temperature is accurate for perfectly crispy tortillas.
Heat olive oil in a skillet over medium-high heat, then add the ground beef and break it into small pieces as it cooks. I use a large non-stick skillet for this because it retains heat evenly and sears the meat well.
Stir in the taco seasoning, chili powder, cumin, salt, and pepper, then transfer everything to a big bowl.
Sauté the Vegetables
Add the remaining olive oil to the same skillet and toss in the garlic and onion. Let them cook for a couple of minutes, until they smell amazing, then toss in the yellow or red bell peppers and cook for a few more minutes, so they’re slightly softened.
Transfer the veggie mixture to the bowl with the beef.
Mix the Filling
Throw in the black beans, jalapeños, and green onions to the bowl and mix everything together. You want all the ingredients evenly distributed so every bite has a good balance of flavors.
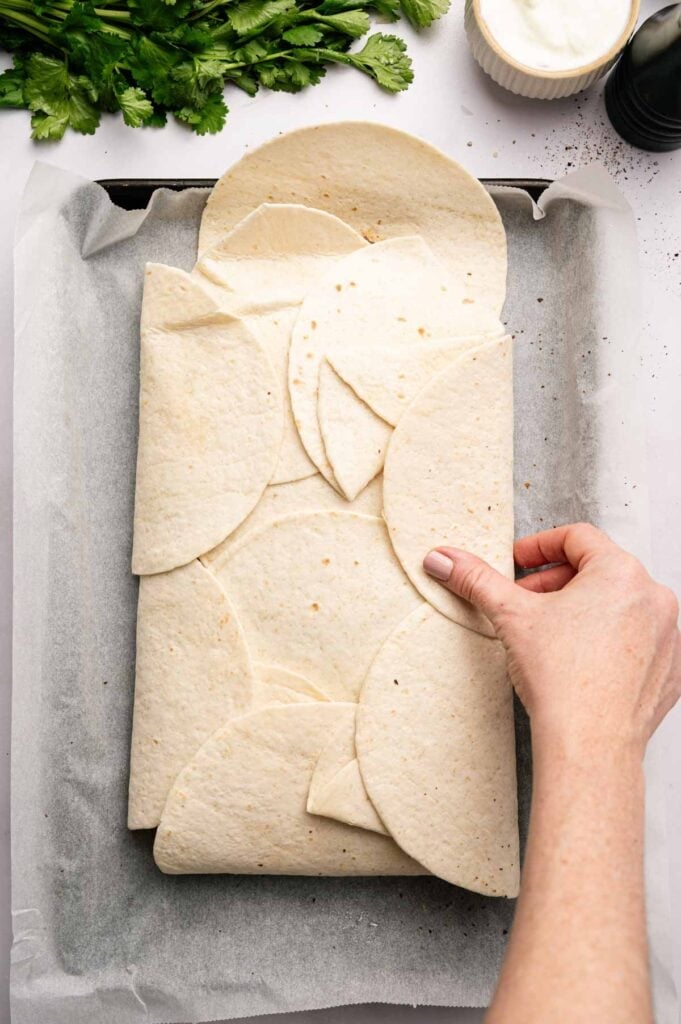
Layer the Tortillas on the Pan
Lightly spray a large baking sheet with cooking spray. This rimmed baking sheet works perfectly because it’s large enough to hold all the tortillas and keeps the filling contained.
Place 2 tortillas in the center of the pan, overlapping them slightly, then arrange 10 more tortillas around the edges so they hang over the sides. This creates the base and the walls that’ll fold over the filling.
Add the Cheese and Filling
Sprinkle half the Monterey Jack cheese over the tortillas, then spread the beef-and-bean mixture evenly over them. Press it down gently with a spatula to ensure it’s distributed evenly across the entire surface.
Add the remaining cheese over the filling.
Seal and Weigh Down
Place 2 more tortillas in the center to cover the filling, then fold the overhanging edges of the bottom tortillas over the top to seal everything inside. Spray the top of the quesadillas lightly with cooking spray, then place a second baking sheet on top to weigh it down.
Nonstick cooking spray works great because it has a high smoke point and won’t leave a weird taste. This helps press everything together and creates those crispy, flat edges.
Bake Until Golden
Bake for 20 minutes with the top sheet on, then remove it and bake for another 15 minutes until the tortillas are golden brown and crispy. The cheese should be fully melted, and the edges should look beautifully toasted.
Rest and Serve
One quick tip: I tested slicing these right away, but letting them sit for about 10 minutes works better. The cheese sets up and you’ll get clean squares instead of a melty mess.I always use a sharp pizza cutter to slice through the layers easily, and it gives you clean cuts.
Serve them warm with salsa, sour cream or Greek yogurt, and guacamole on the side. Enjoy!
If you’re bringing these to a party or potluck, let them cool completely before cutting and transporting. An insulated casserole carrier keeps them warm for hours and prevents the slices from sliding around.
Ingredients
For the Meat:
- 1 pound ground beef
- 2 teaspoons taco seasoning
- 1 teaspoon chili powder
- 1 teaspoon ground cumin
- Salt and pepper to taste
For the Quesadillas:
- 2 large garlic cloves minced
- 1 large onion finely chopped
- 2 bell peppers diced
- 1 15-ounce can low-sodium black beans rinsed and drained
- ¼ cup diced jalapeños adjust to taste
- ½ cup green onions finely chopped
- 2 tablespoons olive oil divided
- 10 large whole wheat tortillas
- 3 cups Monterey Jack cheese shredded
- Cooking spray
- Salsa, sour cream or Greek yogurt, and guacamole for serving

Video
Instructions
- Set your oven to 400°F (200°C) .
- Heat a large skillet over medium-high heat with 1 tablespoon olive oil. Add the ground beef and cook for about 5 minutes, breaking it into small pieces. Stir in taco seasoning, chili powder, cumin, salt, and pepper. Cook for 1 more minute, then transfer to a large bowl.1 pound ground beef, 2 teaspoons taco seasoning, 1 teaspoon chili powder, 1 teaspoon ground cumin, Salt and pepper, 2 tablespoons olive oil
- Add the remaining 1 tablespoon olive oil to the skillet. Sauté the garlic and onion for 2 minutes. Add bell peppers and cook another 3 minutes.2 large garlic cloves, 1 large onion, 2 bell peppers
- Add the mixture to the bowl with the beef. Add black beans, jalapeños, and green onions to the bowl. Mix everything together.1 15-ounce can low-sodium black beans, ¼ cup diced jalapeños, ½ cup green onions
- Lightly coat a large sheet pan with cooking spray. Place 2 tortillas in the center of the pan, slightly overlapping.10 large whole wheat tortillas
- Arrange 10 tortillas around the edges, letting them hang over to form a base.
- Sprinkle 1½ cups cheese over the tortillas. Spread the beef filling evenly on top. Add the remaining 1½ cups cheese.3 cups Monterey Jack cheese
- Place 2 more tortillas in the center, overlapping slightly. Fold the edges of the bottom tortillas over the top to seal.
- Spray lightly with cooking spray and place a second baking sheet on top to weigh it down.Cooking spray
- Bake for 20 minutes. Remove the top sheet and bake 15 minutes more, until golden and crisp.
- Let rest for 10 minutes, then cut into 12 pieces. Serve warm with salsa, sour cream or Greek yogurt, and guacamole.Salsa, sour cream or Greek yogurt, and guacamole
Notes
- Use whole-wheat tortillas: They hold up better in the oven than white-flour tortillas and won’t get soggy under the weight of the filling and cheese.
- Drain the beef well: After cooking the ground beef, drain off any excess fat before mixing it with the vegetables so the filling doesn’t make the tortillas soggy.
- Overlap the tortillas generously: Make sure the tortillas on the edges hang over the sides of the pan by at least 2 inches so you have enough to fold over and seal the top completely.
- Boost the flavor and presentation: Use a half-sheet pan for even baking, specify green bell peppers for milder sweetness, preheat oven to exactly 400°F, drain the beef with a slotted spoon to remove excess grease, arrange tortillas so they hang over the edges of the pan, spread cheese evenly on top of the tortillas, and serve with fresh cilantro and hot sauce on the side.
- Let them rest before cutting: A 10-minute rest lets the cheese set slightly, so the slices hold together better when you cut and serve them.
- Flash freeze for easy storage: Freeze individual slices on a baking sheet for 1 hour, then transfer them to containers so they don’t stick together, and you can grab just what you need.
Nutrition
How to Store Leftovers
Store leftover quesadillas in an airtight container in the fridge for up to 3 days. Reheat individual slices in a 350°F oven for about 10 minutes to crisp them back up, or cook them in a skillet over medium heat for a few minutes on each side.
The microwave works in a pinch, but the tortillas won’t stay as crispy. For longer storage, wrap individual slices tightly in plastic wrap and place them in a freezer bag for up to 2 months. Gallon-size freezer bags with slider closures make it easy to grab individual portions.
Thaw them in the fridge overnight, then reheat in the oven or skillet. Flash freezing them on a baking sheet first prevents the slices from sticking together.
What to Serve With Sheet Pan Quesadillas
If you want to make this a full meal, I usually keep it simple and add easy Mexican rice that goes with everything.
And if you’re doing dips on the side, restaurant-style tortilla chips for scooping and dipping are always a good idea. For dipping, you really can’t beat my easy cowboy queso dip that everyone hovers over.
More Easy Recipes for You to Try at Home
If you love the “everything bakes at once” thing, here are a few more favorites that keep dinner simple and cleanup even simpler.
- Try my hands-off sheet pan chicken dinner next when you want something easy that still feels like a real meal.
- For breakfast, these no-flip oven baked pancakes for a crowd are a weekend favorite.
- If you want something fast, make my bake-all-at-once sheet pan eggs for breakfast-for-dinner nights.
- And for a hearty option, this easy sheet pan sausage and peppers is big on flavor with barely any prep.