
Italian Sandwich Sliders
Italian Sliders are the ultimate combination of deli meats, melted cheese, and buttery-soft rolls baked until golden and irresistible. They’re quick to assemble, packed with flavor, and just the right size for sharing.
This post contains affiliate links. As an Amazon Affiliate, if you purchase through those links, I earn a commission. Thank you!
I love these Italian Sliders appetizers because they’re so versatile and crowd-pleasing. They’re perfect for family dinners or game day spreads. But these mini sandwiches are also great for lunch boxes or picnics.
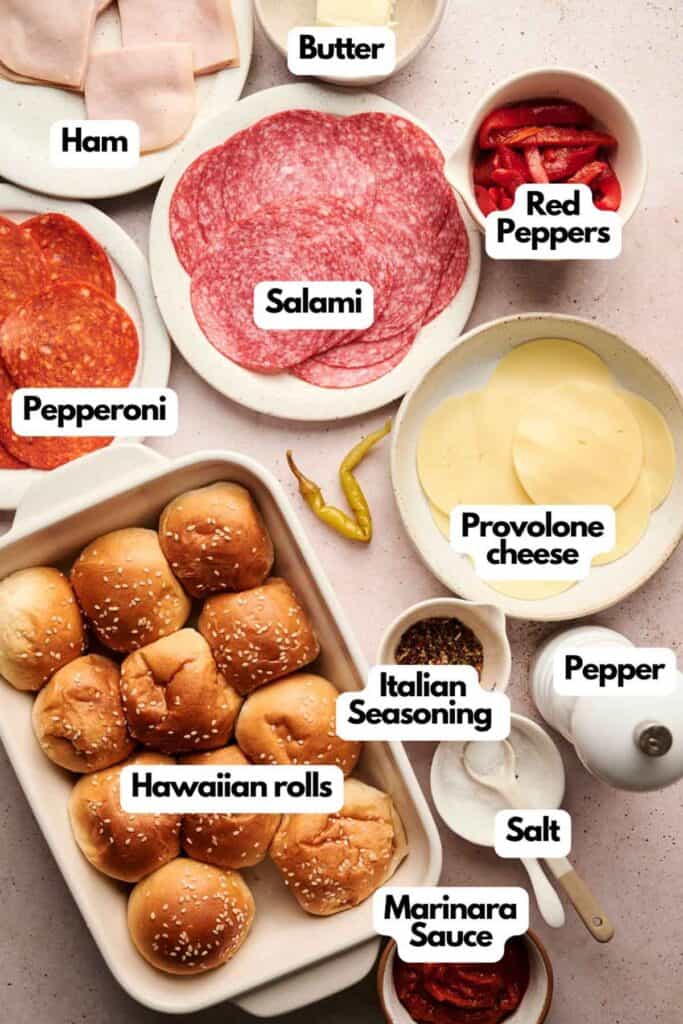
Ingredients You’ll Need
You’ll need all the ingredients shown in the photograph below.
How to Make Italian Sliders with Step-By-Step Instructions
Scroll down for the full recipe card containing a full printable recipe and measurements in both US customary and metric units.
These sliders are easy to assemble and bake. Just follow my simple steps, and you’ll have a tray of warm, melty cheese goodness ready to serve in no time.
Slice and Arrange the Buns
Using a sharp knife, slice the slider buns horizontally, keeping the tops and bottoms connected to make assembly easier. Place the bottom half of the rolls into a baking dish, ensuring they fit snugly to hold the layers in place.
Layer the Meat and Cheese
Start by laying the pepperoni evenly across the buns, followed by a layer of ham and then salami.
Top the meats with a layer of provolone cheese, ensuring the cheese covers all the layers for that gooey, melted texture once baked.
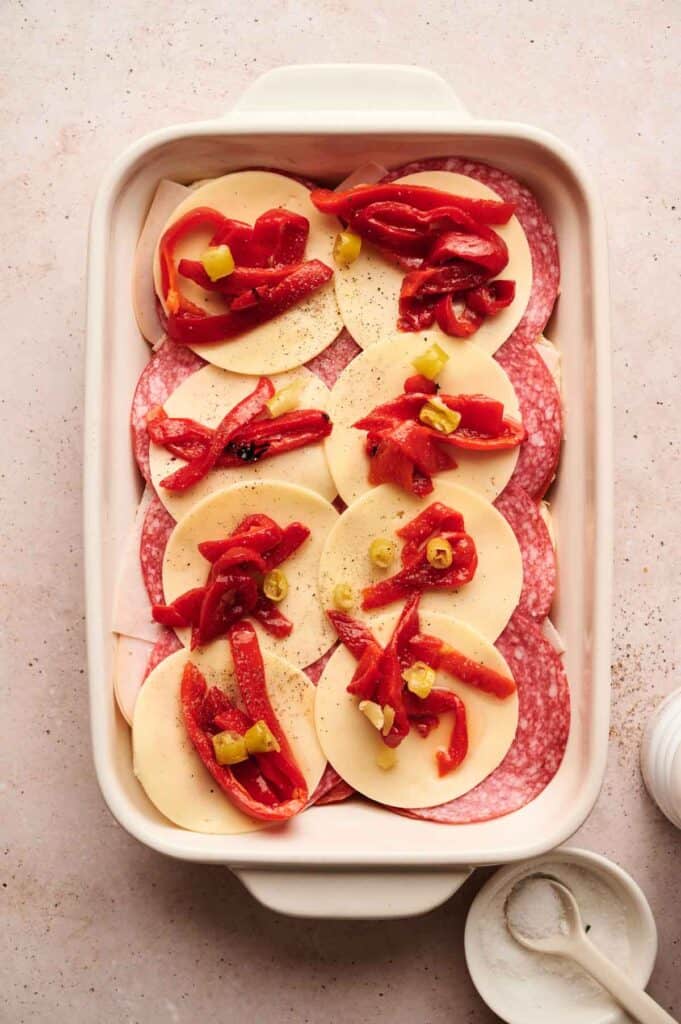
Add Peppers for Extra Flavor
Sprinkle roasted red peppers over the cheese layer for a burst of smoky sweetness. If you’re feeling adventurous, add roasted banana peppers for a tangy, slightly spicy kick.
Finally, Place the top halves of the buns over the fillings.
Brush with Butter and Seasoning
In a small bowl, whisk together the melted butter and Italian seasoning. Brush the top buns generously with the butter mixture.
This step not only adds flavor but also helps the buns achieve a golden, crispy finish.
Bake to Perfection
Cover the baking dish tightly with aluminum foil to retain moisture and ensure the even melting of the cheese.
Bake in a preheated oven at 350°F (180°C) for 25 minutes. Once done, remove the foil and, if desired, brush the top rolls with additional butter for an extra glossy finish.
Serve and Enjoy
Slice the sliders apart and serve them warm with a side of marinara sauce for dipping. Enjoy your sliders!

Ingredients
- 12 count slider buns Hawaiian rolls
- 12 slices ham
- 12 slices salami
- 12 slices pepperoni large rounds
- 6 slices provolone cheese
- ½ cup roasted red peppers slices
- ½ cup roasted banana peppers sliced optional
- ¼ cup butter
- 1 tablespoon Italian seasoning
- Marinara sauce for dipping
Instructions
- Preheat your oven to 350°F (180°C). Slice the slider buns in half horizontally, keeping the top and bottom halves intact. Arrange the bottom halves in a baking dish. Layer the ham evenly over the buns, followed by the salami, pepperoni, and provolone cheese. Sprinkle the roasted red peppers and banana peppers (if using) over the top.12 count slider buns Hawaiian rolls, 12 slices ham, 12 slices salami, 12 slices pepperoni large rounds, 6 slices provolone cheese, ½ cup roasted red peppers slices, ½ cup roasted banana peppers sliced
- In a small bowl, whisk together the melted butter and Italian seasoning. Place the top halves of the buns over the filling and brush the tops generously with the butter mixture.¼ cup butter, 1 tablespoon Italian seasoning
- Cover the dish with foil and bake for 25 minutes. Remove from the oven, and if desired, brush the tops with additional butter before serving. Serve warm with marinara sauce on the side for dipping.Marinara sauce
Notes
- Hawaiian Rolls Work Best: Their sweetness complements the savory meats and cheese beautifully, adding balance to each bite.
- Dry Your Peppers: Roasted red and banana peppers can be juicy. Use a paper towel to pat them dry before layering to prevent soggy sliders.
- Even Layers Matter: Spread the meats and cheese evenly so that every slider gets a consistent balance of flavors.
- Generously Brush the Tops: Don’t skimp on the butter mixture—it not only adds flavor but also gives the buns their irresistible golden sheen.
- Foil is Essential: Covering the sliders with foil traps heat and moisture, ensuring the cheese melts evenly and the tops don’t over-brown.
- Serve Fresh: These sliders are at their best when served warm from the oven, with the cheese melted and gooey.
- Customizable Add-Ons: Feel free to add extras like sliced olives, shredded lettuce, red onion, fresh spinach, or even a sprinkle of parmesan for a unique twist.
Nutrition
Recipe Notes and Expert Tips
Here are some pro tips to help you make the perfect Italian sub sliders every time:
- Hawaiian Rolls Work Best: Their sweetness complements the savory meats and cheese beautifully, adding balance to each bite.
- Dry Your Peppers: Roasted red and banana peppers can be juicy. Use a paper towel to pat them dry before layering to prevent soggy sliders.
- Even Layers Matter: Spread the meats and cheese evenly so that every slider gets a consistent balance of flavors.
- Generously Brush the Tops: Don’t skimp on the butter mixture—it not only adds flavor but also gives the buns their irresistible golden sheen.
- Foil is Essential: Covering the sliders with foil traps heat and moisture, ensuring the cheese melts evenly and the tops don’t over-brown.
- Serve Fresh: These sliders are at their best when served warm from the oven, with the cheese melted and gooey.
- Customizable Add-Ons: Feel free to add extras like sliced olives, shredded lettuce, red onion, fresh spinach, or even a sprinkle of parmesan for a unique twist.
How to Store Leftover Italian Sliders
Leftover sliders can be stored in an airtight container in the refrigerator for up to three days. To reheat, place them in an oven preheated to 350°F until warmed through, which helps maintain their texture.
While freezing is an option (for up to one month), the bread might lose some of its softness after thawing. For best results, reheat from frozen in the oven for a crisp finish.
What to Serve With Italian Subs
Italian Sliders pair beautifully with a variety of sides. Serve them with a fresh Caesar salad for a light option or crispy garlic bread for extra indulgence.
They’re also excellent alongside hearty potato wedges, potato chips, or a refreshing pasta salad. For party platters, complement them with veggie sticks, chips, or mozzarella sticks.
More Easy Game Day Recipes for You to Try at Home
If you’re looking for the perfect game day menu, take a look at these recipes.
This recipe is a 5, but website would not let me enter 5 stars! I made these for Superbowl & they were a HUGE hit! Have made them a couple of times since then. It’s really easy to modify the recipe by adding olives, pickled jalapenos,
tapenade, & olive oil. Love this slider!
I made these for Superbowl party & they were a huge hit! I’ve made them a couple of times since & added purple onion & a mix of olives in olive oil. They r delish! Tried to give u 5 stars, but website would not accept the 5 star rating? Gave this recipe to 5 or 6 people at our Superbowl party.