Crispy Garlic Parmesan Smashed Potatoes

Potatoes don’t always get the spotlight, but Crispy Garlic Parmesan Smashed Potatoes deserve it. Coated in garlic butter and salty Parmesan, they bake up with golden, crisp edges and soft, fluffy centers. One simple step makes them extra crunchy, and you’ll sneak one before they reach the table.

This post contains affiliate links. As an Amazon Affiliate, if you purchase through those links, I earn a commission. Thank you!
I love making these Crispy Garlic Parmesan Smashed Potatoes as a side dish for weeknight dinners, summer BBQs, or holidays like Thanksgiving, Easter, and Christmas. I can make them ahead, reheat them in the oven without losing their golden crunch, or freeze them and bake straight from frozen.
Ingredients You’ll Need
You’ll need all the ingredients shown in the photograph below.

How to Make Crispy Garlic Parmesan Smashed Potatoes with Step-By-Step Instructions
Scroll down for the full recipe card containing a full printable recipe and measurements in both US customary and metric units.
Follow these simple instructions and you’ll get perfectly crispy, buttery smashed potatoes every time.
Preheat the Oven
Preheat your oven to 425°F (220°C). I place an oven thermometer on the middle rack so I know it’s at the right temperature before baking.
Brush a large baking sheet with two tablespoons of olive oil, coating the entire surface to prevent the potatoes from sticking. I like using this rimmed baking sheet to give the potatoes room to spread out.
Set it aside while you prep the potatoes.
Boil the Potatoes
Bring a large pot of water to a boil over high heat. I cook them in a heavy-bottomed stainless steel pot that distributes heat nicely and doesn’t scorch on the bottom.
Add two teaspoons of salt, then carefully drop in the baby potatoes. I use heat-resistant silicone tipped tongs to lower the potatoes into the water so I don’t splash or burn my hands.
Reduce the heat to medium and let them simmer for 15 to 20 minutes, or until they’re fork-tender. Drain the large pot of salted water well, then scatter the potatoes out and gently pat them dry with paper towels to remove excess moisture.
To drain them safely, I pour them into this colander that sits securely in my sink. Then, I use these reusable dishcloths that don’t fall apart when blotting hot food.
Smash the Potatoes
Arrange the cooked potatoes on the prepared baking sheet, leaving a little space between each one so they crisp properly.
Using the flat bottom of a glass or cup, lightly press down on each potato, about ½ inch thick, making sure it stays in one piece while creating plenty of surface area for crisping. I always grab stainless steel measuring cups for pressing if I want a bit more control and weight behind the smash.
First Bake
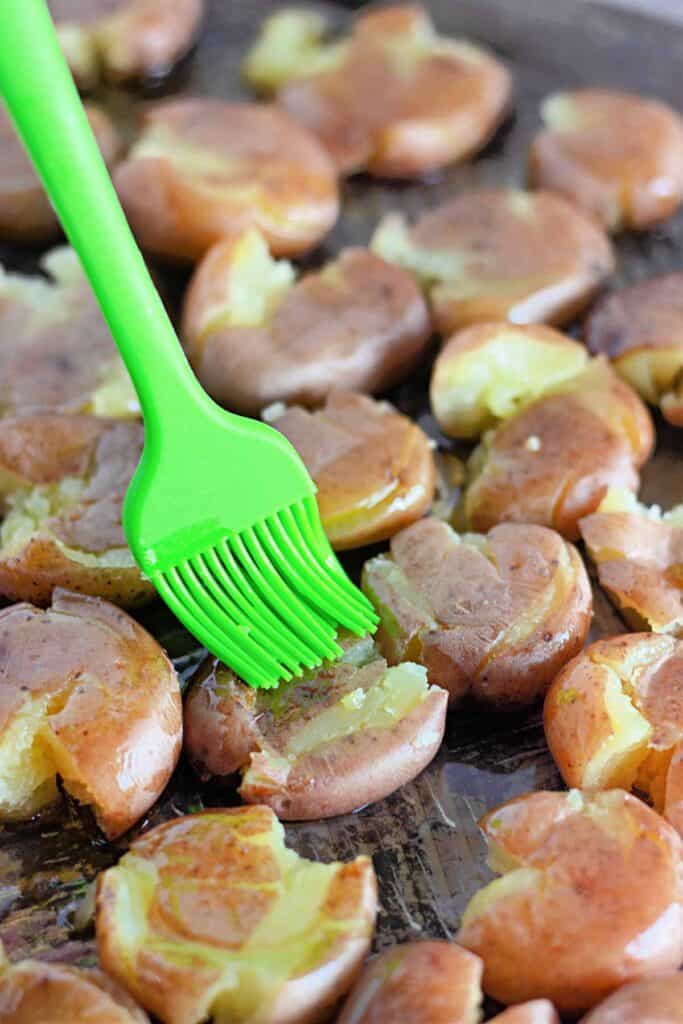
Brush the tops of the smashed potatoes with the remaining one tablespoon of olive oil. I like using my silicone pastry brush here; it spreads the oil evenly across the rough potato surface with no tugging or tearing.
Bake for 15 to 20 minutes, or until the bottoms are golden brown.
Add Garlic Butter and Parmesan
Flip the potatoes carefully using a spatula or tongs, being gentle to keep them intact. For flipping, I reach for a wide silicone turner that slides right under without smashing anything.
In a small bowl, mix the melted butter with the remaining one teaspoon of salt, garlic powder, and black pepper. This glass bowl is what I use for the mixture because it’s transparent, allowing me to easily see if everything is mixed. I also use a set of stainless steel measuring spoons to ensure the amounts of spices are right every time.
Brush this buttery mixture over the tops of the potatoes, letting it soak into the crevices. Sprinkle generously with grated Parmesan cheese, allowing it to melt and crisp in the next bake. To finish things off, I keep my box grater nearby so my cheese is freshly grated.
Second Bake
Return the potatoes to the oven and bake for an additional 8 to 10 minutes, keeping a close eye on them as the cheese melts and turns golden.
You’ll know they’re ready when the tops are bubbly and lightly browned around the edges.
Garnish and Serve
Sprinkle the finished potatoes with fresh parsley for a pop of color and freshness. I always grab these herb scissors here because they give uniform cuts for fresh herbs without bruising the leaves.
Taste one and adjust the seasoning with a little extra salt or pepper if needed. I twist a salt and pepper grinder over the top for fresh seasonings at the table.
Serve them warm while the edges are still crunchy and the cheese is perfectly melty. Enjoy!
If I’m bringing these to a holiday dinner or potluck, I pack them in this container with a lid and handle so nothing spills in the car. A portable food container with locking lids works as well if you want a smaller container for a small batch. Then I slide the whole thing into my insulated casserole carrier to keep them warm until it’s time to eat.

Equipment
Ingredients
- 3 tablespoons extra-virgin olive oil divided
- 3 teaspoons salt divided
- 2 pounds small red or yellow potatoes washed
- 2 tablespoons butter melted
- 1 teaspoon garlic powder
- ½ teaspoon ground black pepper
- ⅓ cup grated Parmesan cheese
- Freshly chopped parsley for garnish, optional
Instructions
- Preheat your oven to 425°F (220°C). Brush a large baking sheet with 2 tablespoons of olive oil and set aside.3 tablespoons extra-virgin olive oil
- Bring a large pot of water to a boil. Add 2 teaspoons salt and the potatoes. Simmer over medium heat for 15–20 minutes, or until fork-tender. Drain and pat dry with paper towels.3 teaspoons salt, 2 pounds small red or yellow potatoes
- Arrange the potatoes on the prepared baking sheet. Using the bottom of a glass or cup, gently press each potato down until it’s about ½-inch thick.
- Brush the tops of the smashed potatoes with the remaining 1 tablespoon of olive oil. Bake for 15–20 minutes, or until the bottoms are golden brown.
- Flip the potatoes. In a small bowl, mix melted butter with 1 teaspoon salt, garlic powder, and black pepper. Brush over each potato. Sprinkle generously with Parmesan. Return the potatoes to the oven for another 8–10 minutes, or until the cheese is golden and crispy.2 tablespoons butter, 1 teaspoon garlic powder, ½ teaspoon ground black pepper, ⅓ cup grated Parmesan cheese
- Sprinkle with chopped parsley and adjust seasoning if needed. Serve warm and enjoy!Freshly chopped parsley
Notes
- Heat the Oven First: Starting with a fully preheated oven is crucial for achieving crispy edges from the beginning.
- Choose the Right Potatoes: Small red potatoes or fingerling potatoes are ideal, as they hold their shape well.
- Start in Cold Water: Place the potatoes in cold water before bringing them to a boil, allowing them to cook evenly from the inside out.
- Oil the Baking Sheet Generously: That first layer of olive oil ensures the bottoms are crisp without sticking.
- Use Parchment Paper if Needed: If you’re not using a nonstick pan, a sheet of parchment paper can help prevent sticking while still allowing browning underneath.
- Flip once for Even Texture: Flipping helps both sides get golden and gives the butter and cheese a chance to crisp up.
- Add Herbs Before the Final Bake: A sprinkle of chopped rosemary or thyme adds extra flavor and gives the kitchen a cozy, savory aroma.
- Try a Paprika or Chili Flake Finish: For a hint of heat or smoky depth, dust the tops with smoked paprika or chili flakes just before the final bake for maximum flavor.
Nutrition
Recipe Notes and Expert Tips
I’ve picked up a few tricks over time that really help these come out crispy and full of flavor.
- Heat the Oven First: Starting with a fully preheated oven is crucial for achieving crispy edges from the beginning.
- Choose the Right Potatoes: Small red potatoes or fingerling potatoes are ideal, as they hold their shape well.
- Start in Cold Water: Place the potatoes in cold water before bringing them to a boil, allowing them to cook evenly from the inside out.
- Oil the Baking Sheet Generously: That first layer of olive oil ensures the bottoms are crisp without sticking.
- Use Parchment Paper if Needed: If you’re not using a nonstick pan, a sheet of parchment paper can help prevent sticking while still allowing browning underneath. I like using precut parchment sheets that lay flat, as they save me from wrestling with the roll.
- Flip once for Even Texture: Flipping helps both sides get golden and gives the butter and cheese a chance to crisp up.
- Add Herbs Before the Final Bake: A sprinkle of chopped rosemary or thyme adds extra flavor and gives the kitchen a cozy, savory aroma.
- Try a Paprika or Chili Flake Finish: For a hint of heat or smoky depth, dust the tops with smoked paprika or chili flakes just before the final bake for maximum flavor.
How to Store Leftovers
Let the potatoes cool completely, then transfer them to an airtight container and store in the refrigerator for up to 4 days. I like using a glass container with a lid to prevent the potatoes from getting soft or losing their texture in the fridge.
To reheat, spread them out on a baking sheet in a single layer and warm in a 375°F oven for 8 to 10 minutes, or until the edges crisp back up and the centers are heated through.
You can also freeze them for up to 2 months if you want to prepare ahead, though the texture may soften slightly once thawed. To keep them from sticking together, I flash-freeze them first on a baking dish or tray before packing them up.
Once they’re solid, I transfer them to these freezer-safe glass containers with locking lids or a reusable freezer-safe bag, pressing out as much air as possible. Both work well and keep the potatoes from getting freezer burn or crushed.
I reheat them straight from frozen in a hot oven or air fryer to help bring back some of that crispiness. I’ve been using an oven-style air fryer for this because it has enough room to reheat evenly and crisps the tops without drying them out.
Just give them a few extra minutes until they’re golden and warmed through.
What to Serve With Crispy Garlic Parmesan Smashed Potatoes
These pair perfectly with bacon, grilled steak, baked chicken, or roast turkey. You can also serve them as a side for Easter, Thanksgiving, or Christmas dinner, or with a simple green salad for a meatless meal. They’re crowd-pleasers at potlucks or backyard BBQs, too.
More Easy Side Recipes for You to Try at Home
I’ve got more easy sides and weeknight favorites you can pair with whatever you’re cooking next.