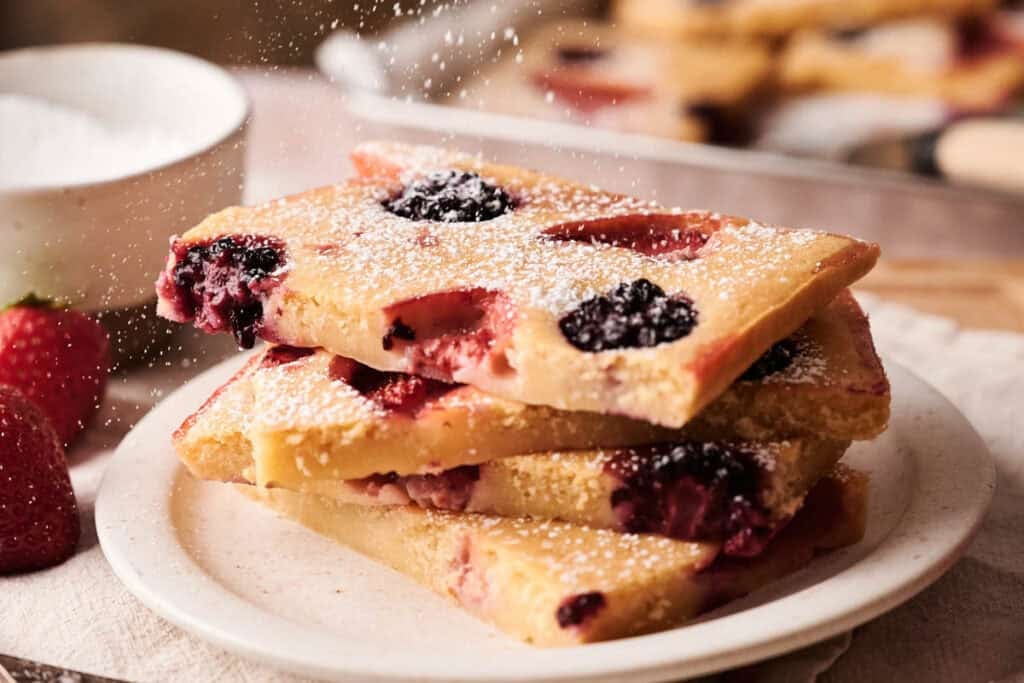
Sheet Pan Pancakes
If flipping pancakes one by one isn’t your idea of a relaxing morning, Sheet Pan Pancakes are a total game changer. You get the same soft, fluffy texture you love, without standing over the stove. Just mix, pour, and bake everything in one pan, then slice and serve. You can even customize each batch with your favorite toppings!
This post contains affiliate links. As an Amazon Affiliate, if you purchase through those links, I earn a commission. Thank you!
These pancakes are an easy crowd-pleaser that fits into any kind of breakfast plan, whether for busy mornings or when we’re hosting brunch. I can prep it ahead, bake once, and serve everyone at the same time. You can keep a stack in the fridge or in the freezer, and either way, it holds up great, so nothing really goes to waste.
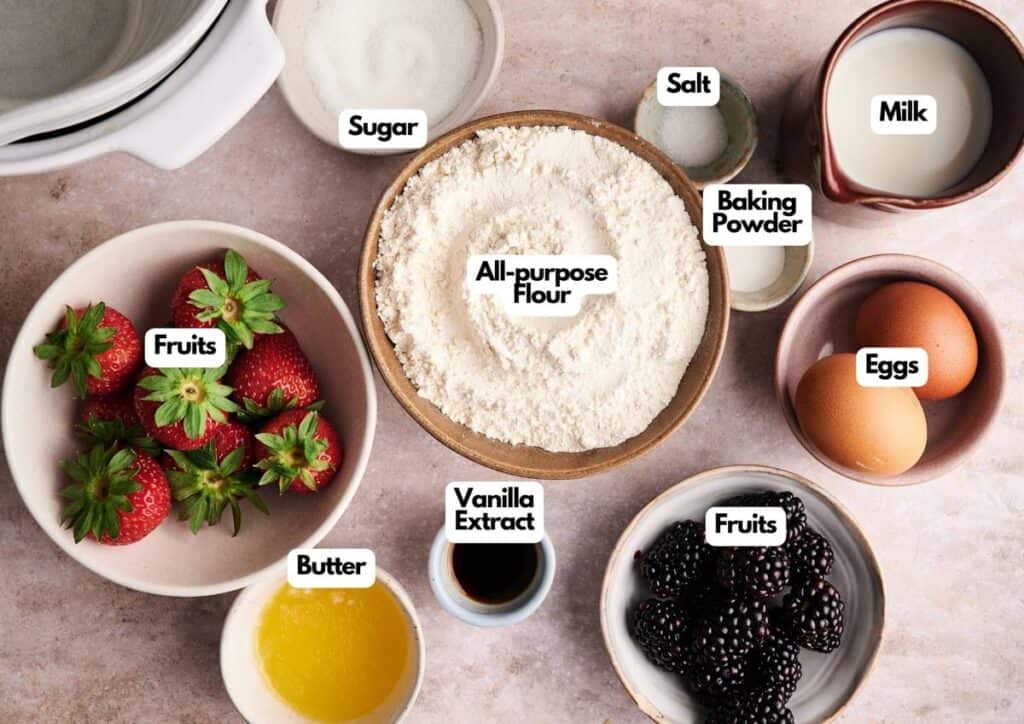
Ingredients You’ll Need
You’ll need all the ingredients shown in the photograph below.
How to Make Sheet Pan Pancakes with Step-By-Step Instructions
Scroll down for the full recipe card containing a full printable recipe and measurements in both US customary and metric units.
You’ll find this recipe super manageable if you follow my simple step-by-step instructions below.
Preheat the Oven and Prep the Pan
Start by setting your oven to 350°F (180°C). Lightly grease a 9×13-inch sheet pan or line it with parchment paper to make cleanup easier.
I like using this half-sheet baking pan because it’s sturdy and distributes heat evenly without warping. I also reach for these pre-cut parchment sheets because they lie flat and fit perfectly in the pan with no curling at the edges.
Mix the Dry Ingredients
In a large mixing bowl, whisk together the flour, sugar, baking powder, and salt until everything is evenly combined. I use a classic balloon whisk like this because it blends the dry ingredients evenly without leaving any lumps.
Combine the Wet Ingredients
In a separate bowl, whisk the milk, eggs, melted butter, and vanilla extract until smooth. For eggs, crack them into a small bowl first to check for shells or any spoilage before adding them to the mixture.
A mixing bowl with a spout like this helps with easy pouring and mess-free prep. Make sure everything is well blended.
Bring It All Together
Pour the wet mixture into the bowl of dry ingredients. Gently stir until just combined—don’t worry if the batter isn’t perfectly smooth. A few lumps are totally fine and will disappear during baking.
If you mix until completely smooth, you risk overworking the gluten in the flour, which can lead to tough, dense pancakes instead of soft and fluffy ones. I like using this silicone rubber spatula to gently fold everything together without overmixing.
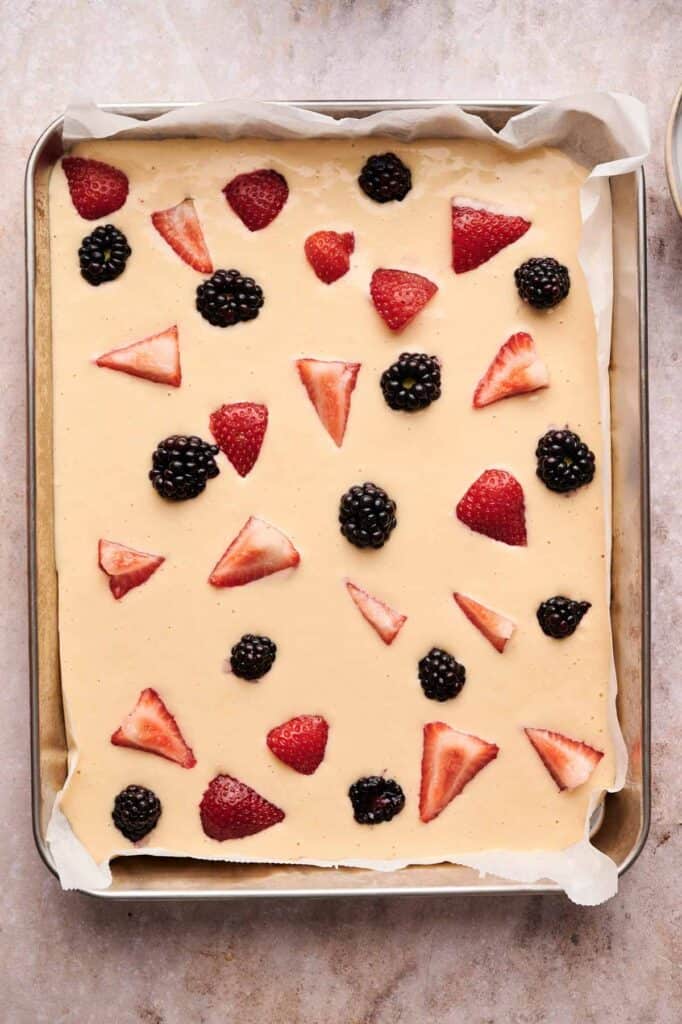
Pour and Top
Transfer the pancake batter to your prepared pan and spread it out into an even layer. A small offset spatula like this helps you smooth it out without disturbing the parchment underneath.
Add fresh berries, like strawberries, blackberries, blueberries, or other toppings of your choice across the surface, so every slice gets a little something.
Bake to Perfection
Bake for 15 to 18 minutes, or until the top is golden and a toothpick poked into the center comes out clean, which means the center is already set. I keep these bamboo toothpicks in a kitchen drawer just for quick doneness checks like this.
Keep an eye on it toward the end so it doesn’t overbake. You can start checking at the 15-minute mark.
Cool, Slice, and Serve
Let the pancakes cool slightly in the pan. This helps them firm up a bit, making it easier to cut clean squares without them falling apart. I use this cooling rack to rest the pan so air can circulate underneath and speed up the cooling.
Then, using a sharp slicing knife like this, cut into squares and serve with powdered sugar, syrup, or whatever toppings you love most. Enjoy!

Equipment
Ingredients
- 2 cups all-purpose flour
- 2 tablespoons sugar
- 1 tablespoon baking powder
- ½ teaspoon salt
- 1 ¾ cups milk
- 2 eggs
- ¼ cup melted butter
- 1 teaspoon vanilla extract
- Red fruits for topping (optional)
- Confectioner’s sugar for topping (optional)
Instructions
- Preheat your oven to 350°F (180°C). Grease or line a sheet pan (around 9×13-inch) with parchment paper.
- In a large bowl, whisk together the flour, sugar, baking powder, and salt. In a separate bowl, whisk the milk, eggs, melted butter, and vanilla extract until well blended.2 cups all-purpose flour, 2 tablespoons sugar, 1 tablespoon baking powder, ½ teaspoon salt, 1 ¾ cups milk, 2 eggs, ¼ cup melted butter, 1 teaspoon vanilla extract
- Pour the wet mixture into the dry ingredients. Stir gently until just combined. Don’t overmix—small lumps are okay.
- Pour the batter into the prepared pan and spread it evenly. Sprinkle fresh berries or your favorite fruits on top, if using.Red fruits
- Bake for 15–18 minutes, or until the top is golden and a toothpick inserted in the center comes out clean.
- Let cool slightly, then slice into squares. Dust with confectioners’ sugar and serve with syrup or your favorite toppings.Confectioner’s sugar
Notes
- Use Room Temperature Ingredients: Cold eggs or milk can cause the butter to solidify. Let them sit out for a few minutes before mixing.
- Whisk Separately First: Mixing wet and dry ingredients in separate bowls makes it easier to avoid overmixing once you combine them.
- Use Pancake Mix in a Pinch: If you’re short on time, you can substitute the dry ingredients with your favorite pancake mix; just follow the mix’s instructions for wet ingredients and bake as directed. It’s a great shortcut for busy mornings.
- Don’t Overmix the Batter: Stir until the flour is just absorbed. Overmixing can lead to dense or chewy pancakes.
- Spread Evenly in the Pan: Use a spatula to level out the batter so everything bakes at the same rate.
- Add Toppings Before Baking: Toss on your favorite berries, sliced bananas, chocolate chips, or nuts, like pecans or walnuts, before the pan goes in the oven so they bake right into the batter and stay in place without sliding off.
- Let It Cool a Bit: Wait a few minutes before slicing so the squares hold their shape better.
- Serve It Your Way: A sprinkle of powdered sugar or a drizzle of warm maple syrup finishes it off nicely. For powdered sugar, I like using this fine mesh strainer to dust it over the pancakes—it gives a light, even coating without any big lumps.
Nutrition
Recipe Notes and Expert Tips
I’ve gathered some simple but effective tips to help your sheet pan pancakes turn out great every time:
- Use Room Temperature Ingredients: Cold eggs or milk can cause the butter to solidify. Let them sit out for a few minutes before mixing.
- Whisk Separately First: Mixing wet and dry ingredients in separate bowls makes it easier to avoid overmixing once you combine them.
- Use Pancake Mix in a Pinch: If you’re short on time, you can substitute the dry ingredients with your favorite pancake mix; just follow the mix’s instructions for wet ingredients and bake as directed. It’s a great shortcut for busy mornings.
- Don’t Overmix the Batter: Stir until the flour is just absorbed. Overmixing can lead to dense or chewy pancakes.
- Spread Evenly in the Pan: Use a spatula to level out the batter so everything bakes at the same rate.
- Add Toppings Before Baking: Toss on your favorite berries, sliced bananas, chocolate chips, or nuts, like pecans or walnuts, before the pan goes in the oven so they bake right into the batter and stay in place without sliding off.
- Let It Cool a Bit: Wait a few minutes before slicing so the squares hold their shape better.
- Serve It Your Way: A sprinkle of powdered sugar or a drizzle of warm maple syrup finishes it off nicely. For powdered sugar, I like using this fine mesh strainer to dust it over the pancakes—it gives a light, even coating without any big lumps.
How to Store Leftovers
Let the leftover pancakes cool completely, then store them in an airtight container in the fridge for up to 3 days. I use this locking-lid food container because it seals tightly and stacks neatly, making fridge storage simple and mess-free.
You can microwave them or pop them into a toaster oven to crisp up the edges. For longer storage, they also freeze well for up to 3 months; just layer parchment paper between slices and pack them into a freezer-safe bag or container.
I usually go with this freezer container because it’s sturdy and protects the pancakes from freezer burn. I also like these gallon-size freezer bags because they’re thick and seal tightly to lock out moisture. Thaw in the refrigerator before reheating.
What to Serve With Sheet Pan Pancakes
Pair these pancakes with savory sides like crispy bacon, sausage patties, or scrambled eggs to add extra protein for a more filling breakfast. They also go well with yogurt, fresh fruit, or a smoothie if you want something lighter with more fiber.
For a brunch spread, try setting out some topping options like syrup, whipped cream, and nut butter so everyone can build their own plate with a mix of flavors, nutrients, and textures.
More Easy Recipes for You to Try at Home
I’ve got more simple and delicious recipes just like this one to help you make breakfast or brunch without the stress.