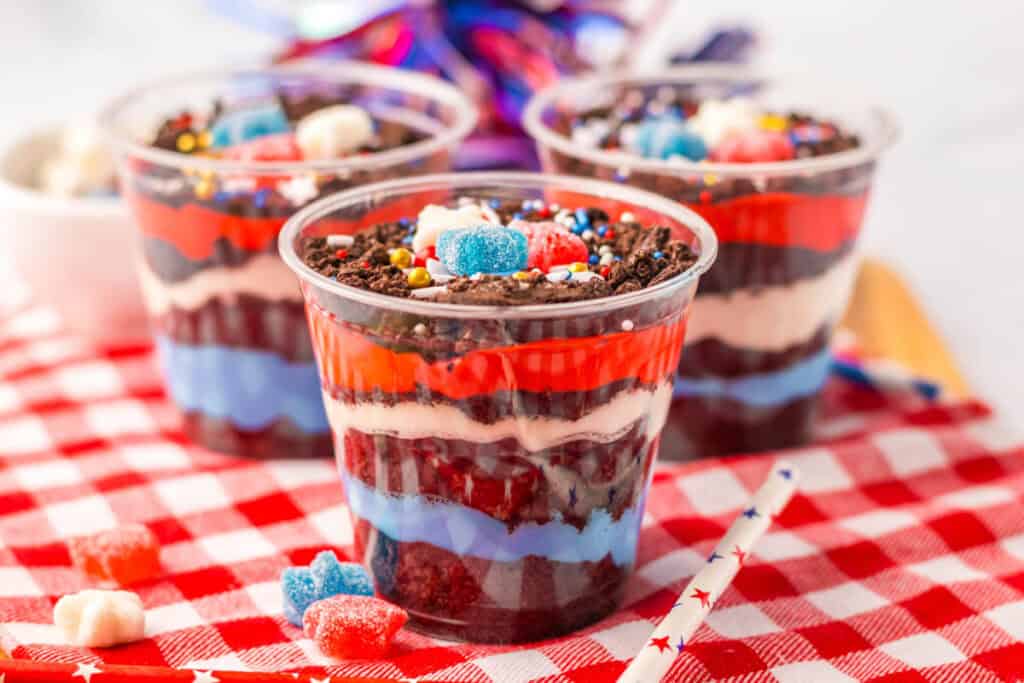
Easy Red, White and Blue Dirt Cups Recipe
If you’re going to celebrate, you may as well do it in style – right? So let’s go all in with these easy Red, White, and Blue Dirt Cups. Not only are they super easy to make using simple ingredients, but you can customize them to suit your own taste. They can be made ahead of time, and even the kids can get involved in making them. The perfect way to celebrate!
I love that this easy dessert doesn’t involve baking, and the dirt cups are very easily transported, so it doesn’t matter if you’re celebrating at home or away. They are cost-effective and tasty grab-and-go treats that show you’ve made an effort for the 4th of July or Memorial Day without breaking the bank.
Ingredients You’ll Need
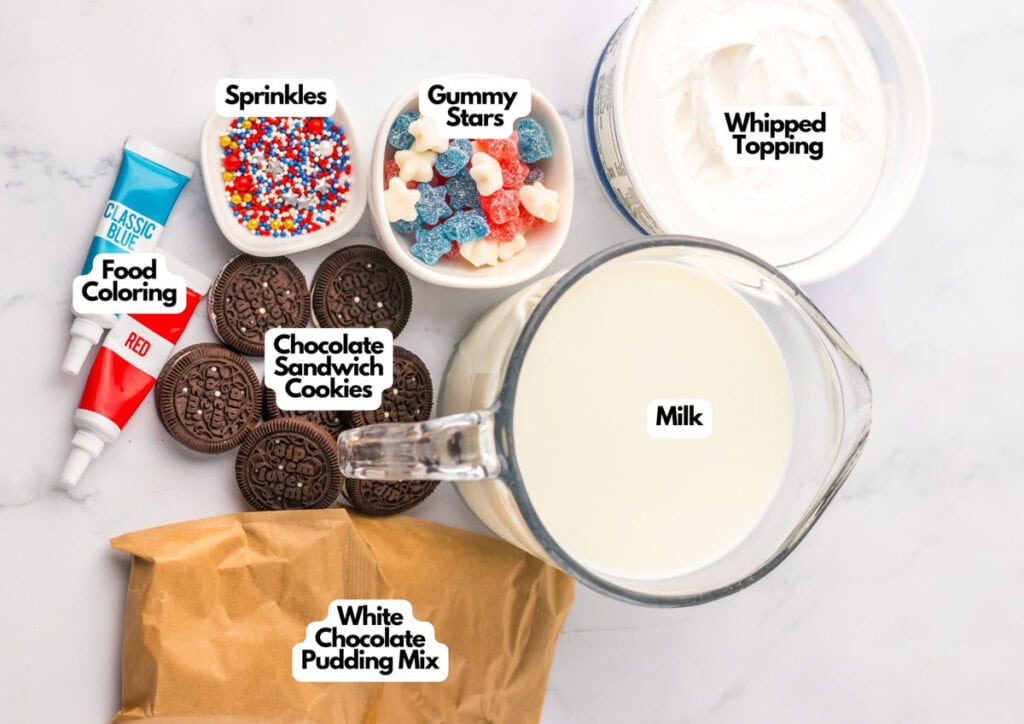
You’ll need all the ingredients in the photograph below.
How to Make Red, White, and Blue Dirt Cups with Step-By-Step Instructions
Scroll down for the full recipe card containing a full printable recipe and measurements in both US customary and metric units.
Prepare the Cookie Base
Crush all the cookies using a food processor or by placing them in a Ziploc bag and rolling over them with a rolling pin. Involve the kids for some fun, and enjoy easy cleanup.
Mix the Pudding
Whisk the cold milk and white chocolate pudding mix in a large bowl until smooth and creamy. Make sure all the powder is well dissolved to avoid any lumps in your dessert.
SERIOUSLY GOOD
DESSERTS!
Dessert First is a collection of 61 RECIPES to show you that you can make beautiful, impressive desserts right in your own kitchen, no matter your skill level.
Immediate eBook download. No physical book available.
∙ Lemon Pound Cake
∙ Starbucks Cake Pops
∙ Boston Cream Pie
∙ Chocolate Mousse
∙ Matcha Tiramisu
...and much more!
Includes ad-free recipes like:

Divide and Color
Evenly distribute the pudding into three bowls. Add red food coloring to one, blue to another, and leave the third as white. Gradually add the coloring to achieve the perfect shade without overdoing it.
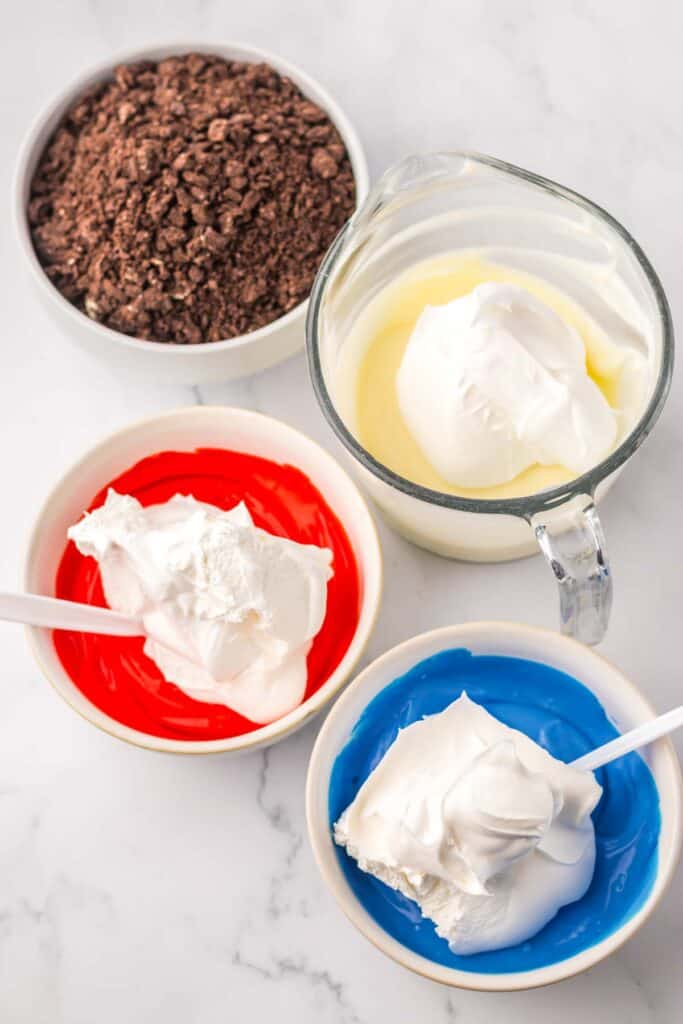
Combine with Whipped Topping
Fold the whipped topping into each bowl of colored pudding gently. This process not only makes the pudding light and fluffy but also helps the colors stand out.
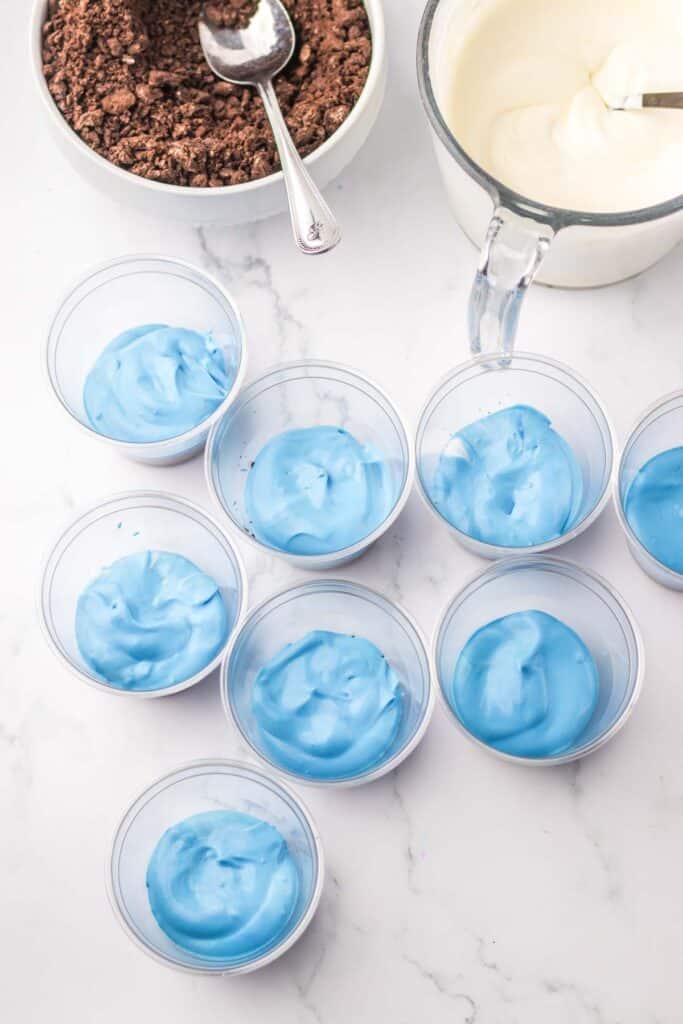
Layer Your Dirt Cups
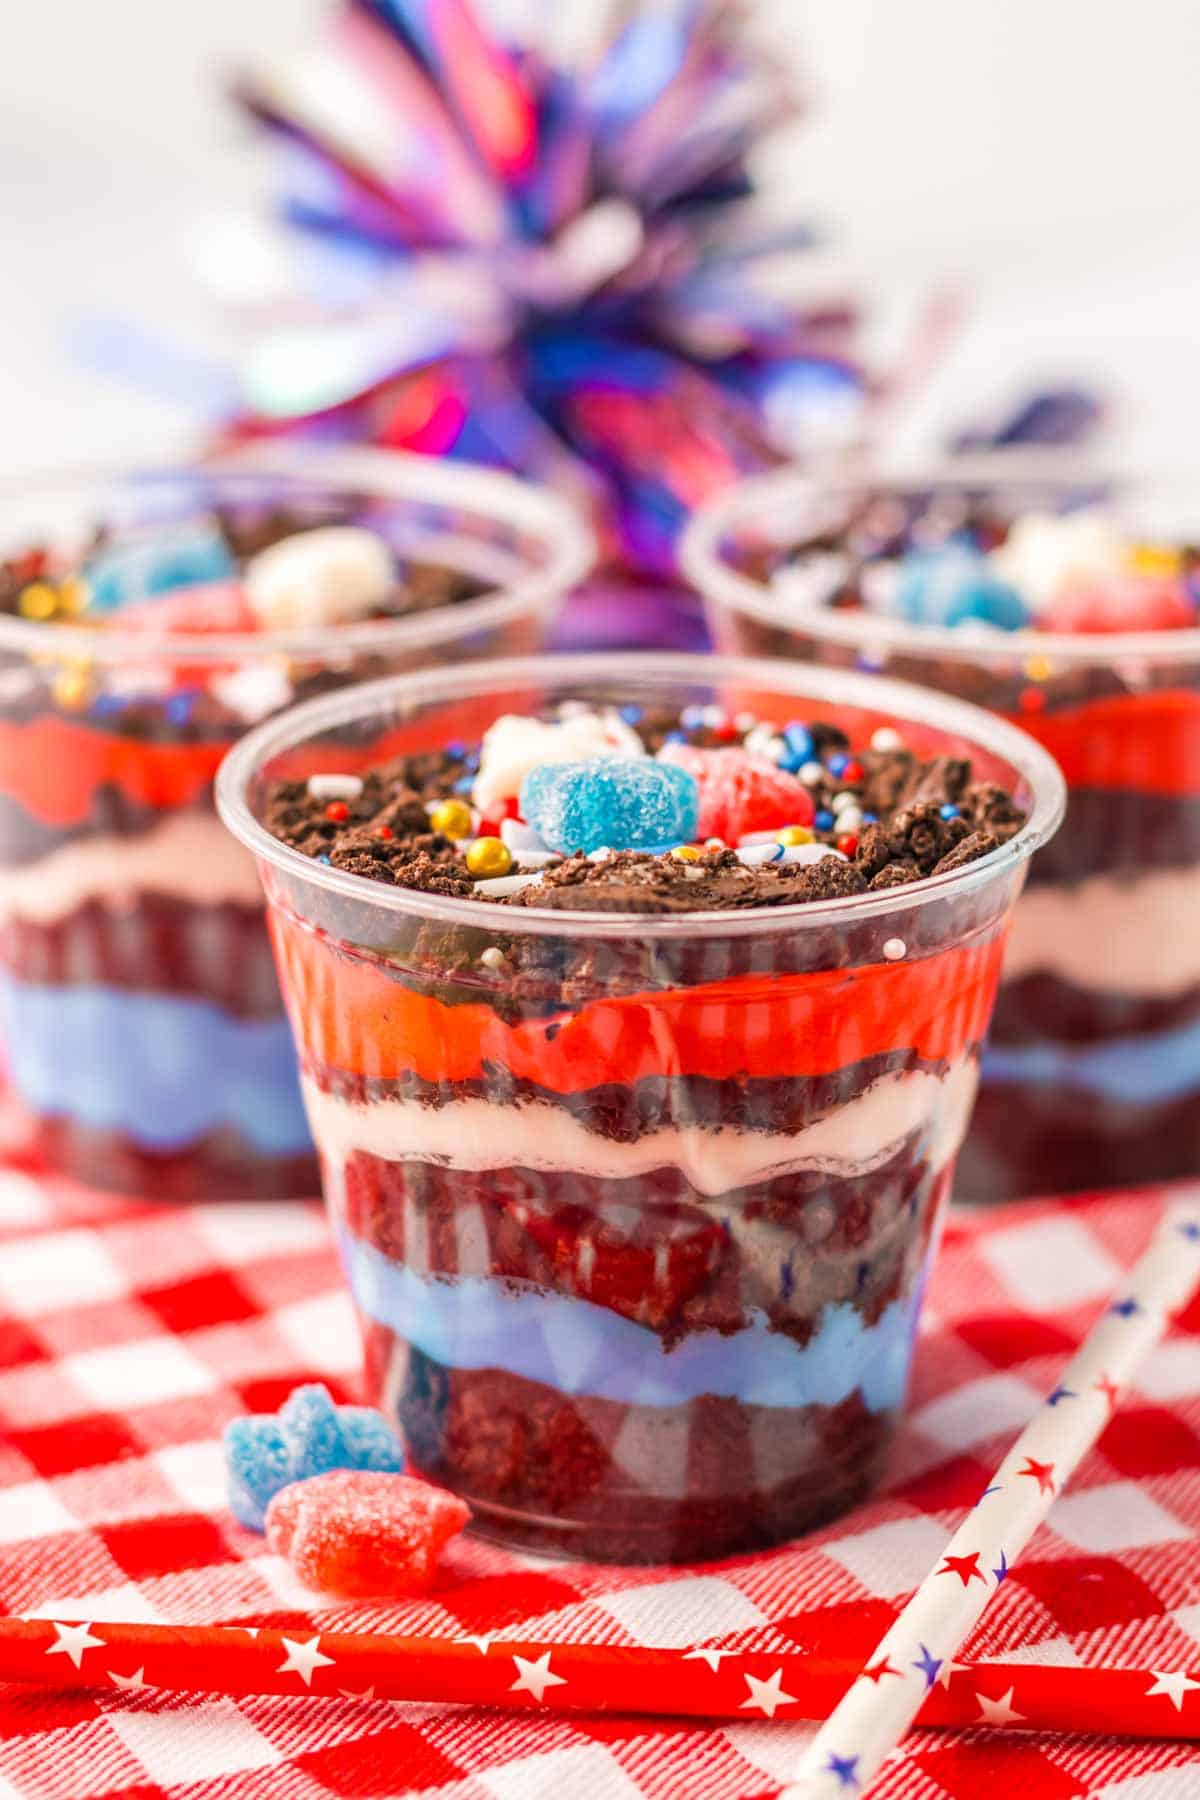
Begin layering in each disposable cup, starting with cookie crumbs, followed by blue pudding, more crumbs, white pudding, more crumbs, and red pudding. Finish with a final layer of crumbs. This means every spoonful is packed with tasty flavors and colors.
Add the Final Touches
Decorate each cup with festive sprinkles and a gummy star on top for an extra touch of fun and texture.
Ingredients
- 13.9 ounce pack of chocolate sandwich cookies
- 4 cups cold milk
- 2 3.4-ounce boxes instant white chocolate pudding mix
- Red and blue food coloring
- 1 8-ounce container whipped topping thawed
- 8 9-ounce disposable cups
- Gummy stars
- Festive sprinkles
Instructions
- Crush up all your cookies either using a food processor or crushing them in a Ziploc bag.13.9 ounce pack of chocolate sandwich cookies
- In a large bowl whisk together the milk and white chocolate pudding mix until smooth and creamy.4 cups cold milk, 2 3.4-ounce boxes instant white chocolate pudding mix
- Separate the pudding base equally into three bowls.
- Add red food coloring to one bowl and blue food coloring to another bowl, leaving the third bowl uncolored (white).Red and blue food coloring
- Fold an equal amount of whipped topping into each of the three pudding mixtures (red, blue, and white) until well combined.1 8-ounce container whipped topping thawed
- In 9-ounce disposable cups layer the cookie crumbs, blue pudding, cookie crumbs, white pudding, cookie crumbs, red pudding, and a final layer of cookie crumbs.8 9-ounce disposable cups
- Top each cup with sprinkles and gummy stars for a festive touch.Festive sprinkles, Gummy stars
Notes
- Cookie Choice Matters: Opt for chocolate sandwich cookies that crumble well for a firm base. Store-brand cookies work just as well as name brands, helping keep costs low.
- Milk Temperature: Use cold milk to mix the pudding to speed up the setting process, ensuring your layers firm up faster and hold their shape better.
- Achieving Vibrant Colors: Start with a few drops of food coloring and adjust to achieve the desired intensity. Remember, a little goes a long way!
- Whipped Topping Tips: Thaw the whipped topping in the refrigerator rather than at room temperature to maintain its stability when folding into the pudding.
- Layering Technique: For the sharpest layers, use a small spoon or a piping bag to add each pudding layer carefully. This helps prevent the colors from blending.
- Make Ahead: You can prepare these cups a day in advance—just cover and refrigerate. This is perfect for easing the stress on the day of your event.
- Transporting: If you’re bringing these to a party, place the cups in a shallow tray or baking sheet for easy carrying and keep them chilled.
- Customizing: Feel free to add different toppings like mini marshmallows or chocolate chips to match the theme of your gathering or to simply spice things up.
Nutrition
SERIOUSLY GOOD
DESSERTS!
Dessert First is a collection of 61 RECIPES to show you that you can make beautiful, impressive desserts right in your own kitchen, no matter your skill level.
Immediate eBook download. No physical book available.
∙ Lemon Pound Cake
∙ Starbucks Cake Pops
∙ Boston Cream Pie
∙ Chocolate Mousse
∙ Matcha Tiramisu
...and much more!
Includes ad-free recipes like:
Recipe Notes and Expert Tips
The last thing you want on a holiday day is a disaster on your hands, so here are my top tips for making perfect Red, White, and Blue Dirt Cups every time!
- Cookie Choice Matters: Opt for chocolate sandwich cookies that crumble well for a firm base. Store-brand cookies work just as well as name brands, helping keep costs low.
- Milk Temperature: Use cold milk to mix the pudding to speed up the setting process, ensuring your layers firm up faster and hold their shape better.
- Achieving Vibrant Colors: Start with a few drops of food coloring and adjust to achieve the desired intensity. Remember, a little goes a long way!
- Whipped Topping Tips: Thaw the whipped topping in the refrigerator rather than at room temperature to maintain its stability when folding into the pudding.
- Layering Technique: For the sharpest layers, use a small spoon or a piping bag to add each pudding layer carefully. This helps prevent the colors from blending.
- Make Ahead: You can prepare these cups a day in advance—just cover and refrigerate. This is perfect for easing the stress on the day of your event.
- Transporting: If you’re bringing these to a party, place the cups in a shallow tray or baking sheet for easy carrying and keep them chilled.
- Customizing: Feel free to add different toppings like mini marshmallows or chocolate chips to match the theme of your gathering or to simply spice things up.
How to store Red, White, and Blue Dirt Cups
Keeping your leftover Red, White, and Blue Dirt Cups fresh and delicious is simple. To keep the layers nice and moist, cover each cup with plastic wrap or place them in an airtight container. Store them in the fridge, where they’ll stay good for up to three days.
More Easy Recipes for You to Try at Home
I love entertaining on the holidays, and here are some of my favorite crowd-pleasing appetizers.