
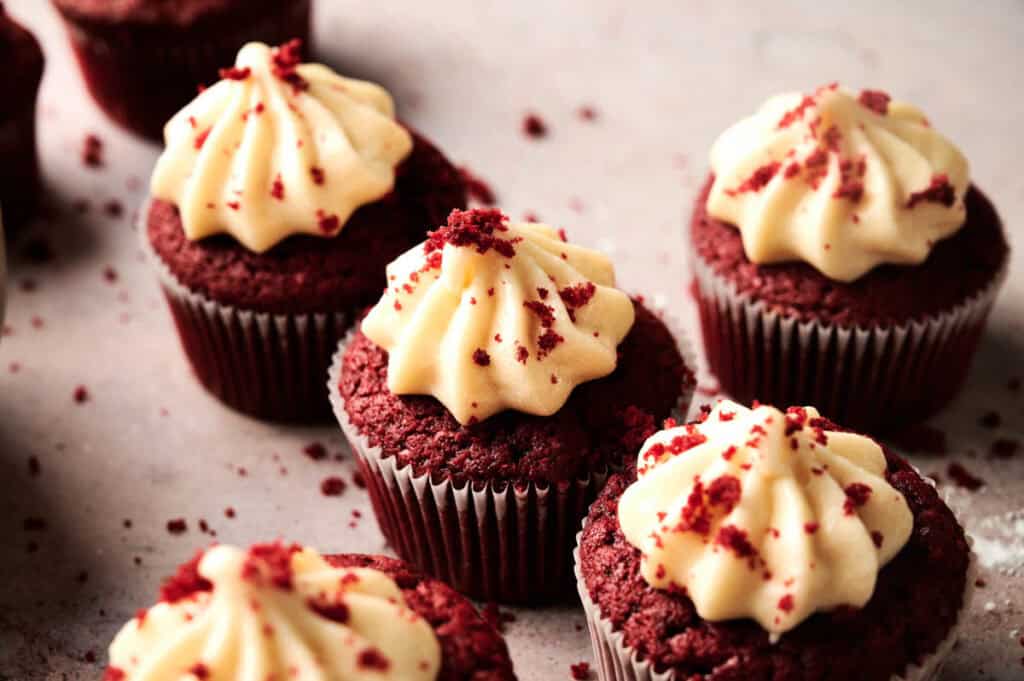
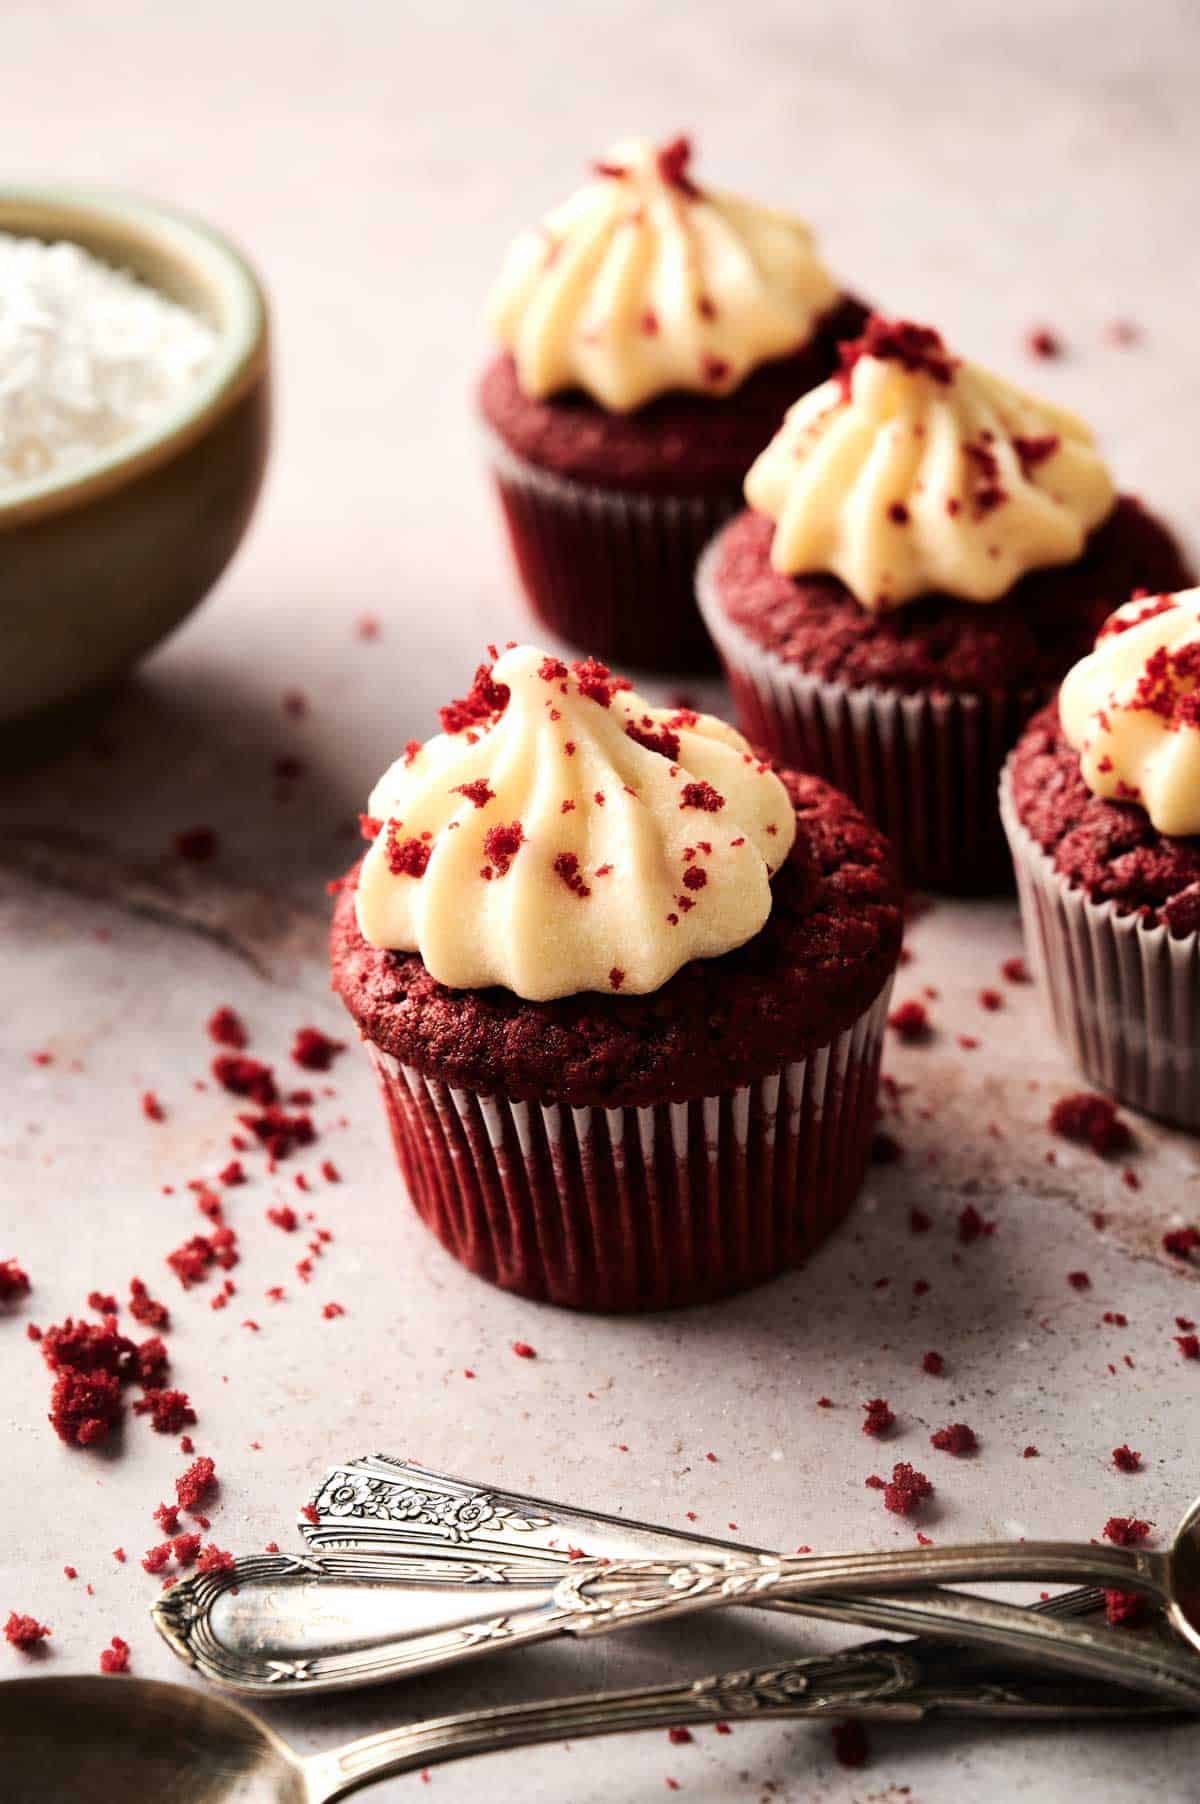
Red Velvet Cupcakes

Red Velvet Cupcakes have a tender, velvety crumb that comes from buttermilk and brown sugar. The hint of cocoa adds subtle chocolate flavor, and the red color makes them look vibrant. The smooth, tangy cream cheese frosting on top balances the sweetness perfectly. You’ll find yourself reaching for seconds immediately.
This post contains affiliate links. As an Amazon Affiliate, if you purchase through those links, I earn a commission. Thank you!
I make them for birthday parties, Valentine’s Day, Christmas celebrations, baby showers, and wedding events because they’re always a crowd-pleasing dessert. They’re one of those cupcake recipes that I can prep ahead since they stay fresh at room temperature for 3 days or in the fridge for up to a week, and freeze them for 2 to 3 months.
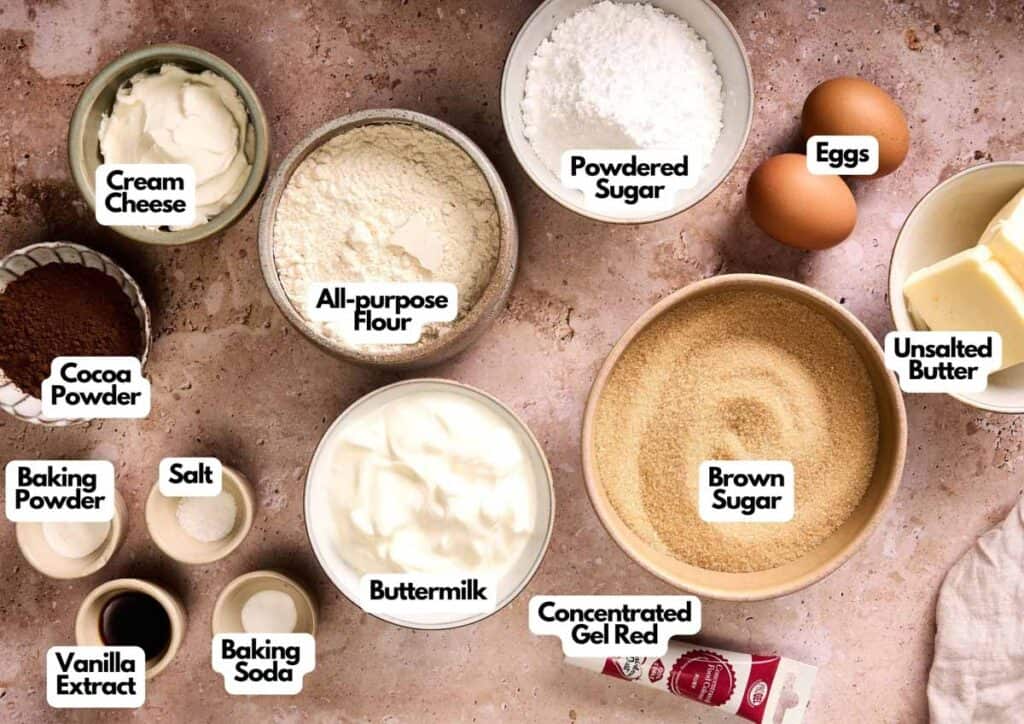
Ingredients You’ll Need
You’ll need all the ingredients shown in the photograph below.
How to Make Red Velvet Cupcakes
Scroll down for the full recipe card containing a full printable recipe and measurements in both US customary and metric units.
Here’s how to make the best red velvet cupcakes from scratch.
Prep the Oven and the Pan
Preheat your oven to 350°F and line a cupcake pan with cupcake papers. Give the top of the pan a light coating of nonstick spray so the cupcakes release easily.
Mix the Dry Ingredients
In a large bowl, whisk together the flour, cocoa powder, baking soda, baking powder, and salt until everything’s evenly distributed. Set it aside.
SERIOUSLY GOOD
DESSERTS!
Dessert First is a collection of 61 RECIPES to show you that you can make beautiful, impressive desserts right in your own kitchen, no matter your skill level.
Immediate eBook download. No physical book available.
∙ Lemon Pound Cake
∙ Starbucks Cake Pops
∙ Boston Cream Pie
∙ Chocolate Mousse
∙ Matcha Tiramisu
...and much more!
Includes ad-free recipes like:

Cream the Butter and Sugar
In a large mixing bowl of your stand mixer fitted with the paddle attachment (or use a hand mixer), beat the butter, brown sugar, red food coloring, and vanilla on low speed just until combined.
Turn it up to medium-high and beat for about 2 minutes until the mixture looks light, fluffy, and almost mousse-like.
The brown sugar won’t fully dissolve, and that’s exactly what you want; those tiny sugar granules will melt during baking and create little pockets of moisture that keep the cupcakes tender.
Add the Eggs One at a Time
Scrape down the sides of the bowl with a silicone spatula, then add the eggs to the wet ingredients, one at a time. Beat well after each addition so they’re fully incorporated before you add the next one.
If you add both eggs at once, the mixture may curdle or separate.
Alternate Dry Mixture and Buttermilk
Turn the mixer to low speed and add about a third of the dry ingredients. Once they’re mostly mixed in, pour in half the buttermilk. Add another third of the dry ingredients, the remaining buttermilk, and finish with the last of the dry ingredients.
Mix just until you don’t see any flour streaks. Don’t overmix the batter, or you’ll develop too much gluten, and the cupcakes will turn out tough and dense.
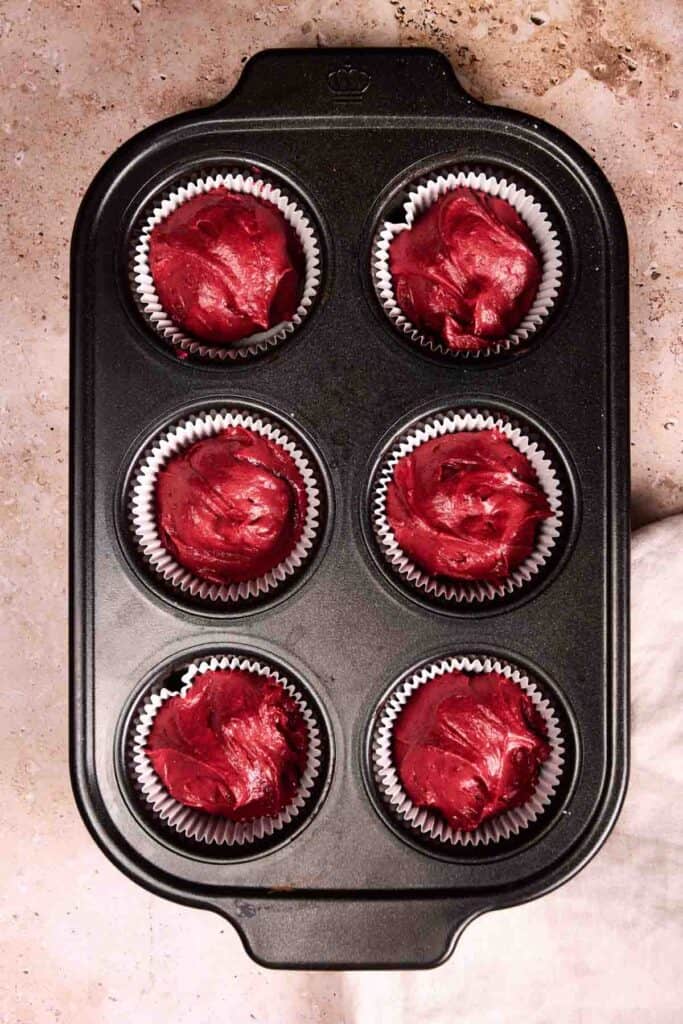
Fill, Bake, and Cool Completely
Use a cookie scoop or spoon to divide the batter evenly among the cupcake liners, filling each one almost to the top. You want to leave just a little room (about ¼ inch), so the batter doesn’t spill over the edges as the cupcakes rise in the oven.
Bake for 22 to 24 minutes, checking at the 22-minute mark. A toothpick inserted into the center should come out clean or with just a few moist crumbs.
Let the baked cupcakes cool in the pan for 15 minutes, then transfer them to a wire rack to cool completely. They need to be totally cool before you frost them, or the cream cheese frosting will melt and slide right off.
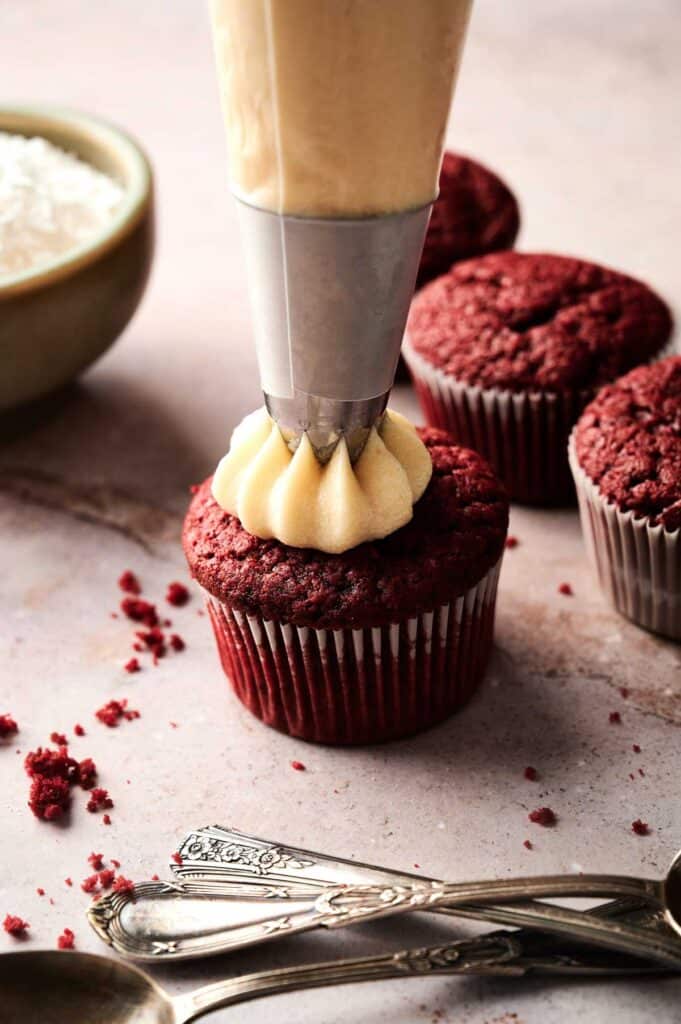
Make the Cream Cheese Frosting
In a clean bowl, beat the softened butter, cream cheese, vanilla, salt, and powdered sugar until smooth and creamy. You can spread it on rustic-style with an offset spatula or pipe it using a piping bag and your favorite tip for a bakery-style finish.
Serve and Enjoy
Now, this last step is up to you, but I like sprinkling a few cake crumbs over the frosted tops because it adds texture and makes them look professionally decorated. Either way, they taste just as delicious, so enjoy!
These cupcakes travel beautifully if you pack them properly. Keep the frosted cupcakes in a single layer in a hard-sided cupcake carrier to prevent the frosting from smudging.
If you’re traveling in warm weather, store them in the fridge until the last possible moment, then transport them in a cooler with ice packs to keep the cream cheese frosting from softening.
Equipment
Ingredients
For the Cupcakes:
- 1 ½ cups all-purpose flour
- 4 tablespoons Dutch-processed cocoa powder
- ½ teaspoon baking soda
- ¾ teaspoon baking powder
- ¼ teaspoon salt
- ½ cup unsalted butter at room temperature
- 1 ½ cups light brown sugar
- 1 teaspoon concentrated red gel food coloring
- 1 ½ teaspoons vanilla extract
- 2 large eggs at room temperature
- 1 cup buttermilk
For the Cream Cheese Frosting:
- ¼ cup unsalted butter softened
- 4 ounces cream cheese softened
- ½ teaspoon vanilla extract
- ½ teaspoon salt
- 2 cups powdered sugar

Video
Instructions
- Preheat the oven to 350°F (180°C). Line a cupcake pan with paper liners and lightly grease the top of the pan.
- In a medium bowl, whisk together flour, cocoa powder, baking soda, baking powder, and salt. Set aside.1 ½ cups all-purpose flour, 4 tablespoons Dutch-processed cocoa powder, ½ teaspoon baking soda, ¾ teaspoon baking powder, ¼ teaspoon salt
- In a stand mixer (or with a hand mixer), beat butter, brown sugar, red food coloring, and vanilla on low until just combined, then on medium-high for about 2 minutes until light and fluffy.½ cup unsalted butter, 1 ½ cups light brown sugar, 1 teaspoon concentrated red gel food coloring, 1 ½ teaspoons vanilla extract
- Scrape the bowl, then beat in the eggs one at a time, mixing well after each addition.2 large eggs
- On low speed, alternate adding the dry ingredients and buttermilk, beginning and ending with the dry ingredients. Mix just until combined — do not overmix.1 cup buttermilk
- Spoon the batter into cupcake liners, filling each almost to the top. Bake for 22–24 minutes, or until a toothpick inserted into the center comes out clean.
- Let cupcakes cool in the pan for 15 minutes, then transfer to a wire rack to cool completely before frosting.
- Beat butter, cream cheese, vanilla, salt, and powdered sugar, mixing until fully incorporated.¼ cup unsalted butter, 4 ounces cream cheese, ½ teaspoon vanilla extract, ½ teaspoon salt, 2 cups powdered sugar
- Spread or pipe cream cheese frosting generously on top of the cooled cupcakes.
Notes
Nutrition
SERIOUSLY GOOD
DESSERTS!
Dessert First is a collection of 61 RECIPES to show you that you can make beautiful, impressive desserts right in your own kitchen, no matter your skill level.
Immediate eBook download. No physical book available.
∙ Lemon Pound Cake
∙ Starbucks Cake Pops
∙ Boston Cream Pie
∙ Chocolate Mousse
∙ Matcha Tiramisu
...and much more!
Includes ad-free recipes like:
How to Store Leftovers
Keep unfrosted cupcakes in an airtight container at room temperature for up to 3 days, or store frosted ones in the fridge for up to a week, since cream cheese frosting needs to stay chilled. Let them sit at room temperature before serving so they’re not too cold.
For longer storage, freeze unfrosted cupcakes in a freezer-safe container for 2 to 3 months. Thaw them overnight in the fridge, then on the counter, and frost right before serving. The frosting doesn’t freeze as well, so it’s best to make it fresh.
What to Serve With Red Velvet Cupcakes
Serve them with a glass of cold milk, a cup of hot coffee, or even a scoop of vanilla ice cream on the side for an extra indulgent dessert. For parties, set them out alongside other finger desserts like lemon bars or sugar cookies so guests can mix and match flavors.
They’re sweet enough to stand alone, but if you’re putting together a dessert spread, pair them with chocolate chip cookies, brownies, or a fruit platter to balance the richness. The tangy frosting and tender crumb make them versatile enough to fit into any dessert table without clashing with other sweets.
More Easy Recipes for You to Try at Home
Check out these other sweet dessert recipes with a homemade twist.