
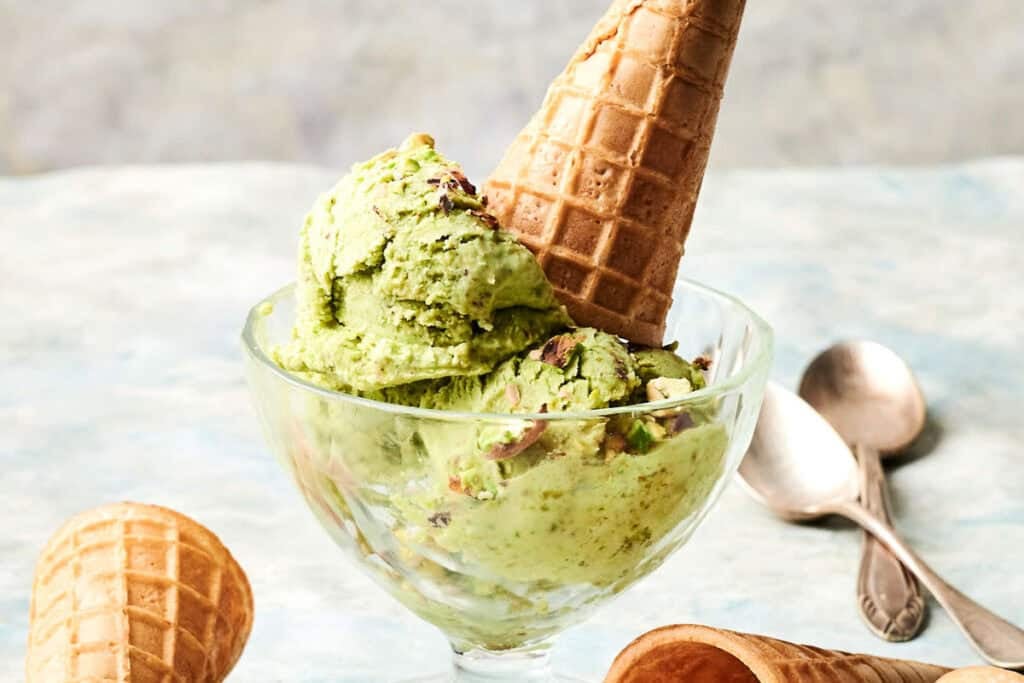
Pistachio Ice Cream
Pistachio Ice Cream is a fan favorite for a reason—it’s got that unique flavor, nuttiness, and creaminess that really sets it apart. This homemade ice cream skips the artificial stuff, and is even better if pistachio is your favorite ice cream flavor because it uses real pistachios. You don’t even need eggs or custard, and whether or not you add a drop of green food coloring is up to you.
This post contains affiliate links. As an Amazon Affiliate, if you purchase through those links, I earn a commission. Thank you!
This homemade pistachio ice cream always disappears faster than anything else on the table whenever I have a few friends or family coming over for dinner. It’s funny because they’re asking every time where I bought this ice cream, and I’ve got to tell them it’s not from any ice cream parlor or grocery store—I made it. Of course, it freezes beautifully, so make a batch ahead and you have a summer treat ready.
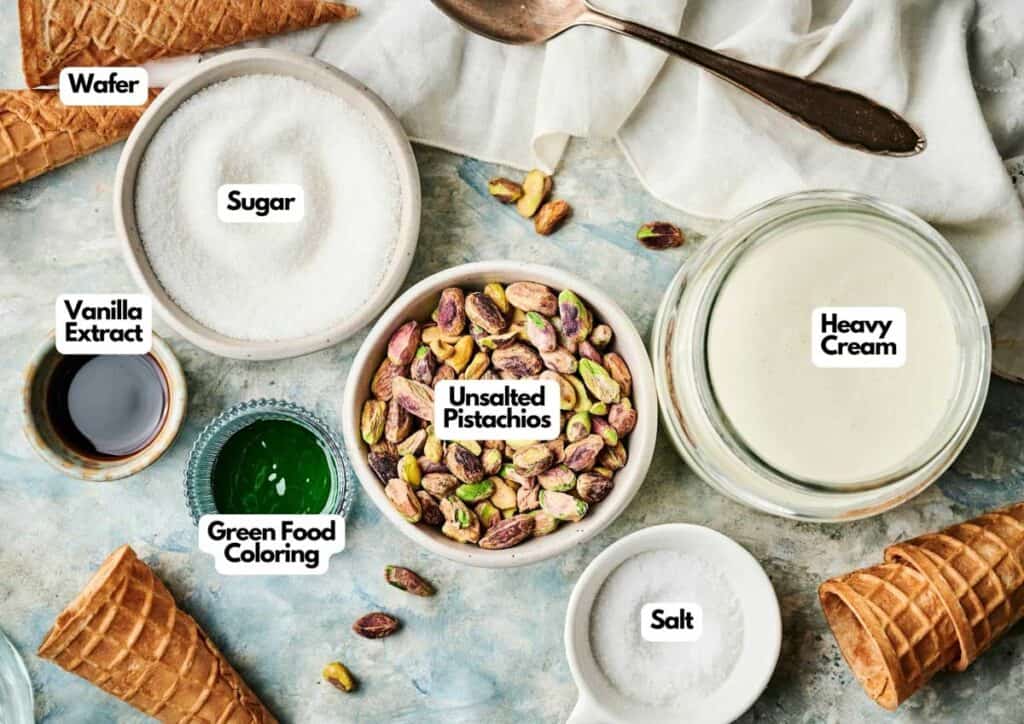
Ingredients You’ll Need
You’ll need all the ingredients shown in the photograph below.
How to Make Pistachio Ice Cream with Step-By-Step Instructions
Scroll down for the full recipe card containing a full printable recipe and measurements in both US customary and metric units.
When you follow my easy steps below, you’ll have a creamy, nutty pistachio ice cream that tastes like you got it from a scoop shop.
Blend the Pistachios and Sugar
Toss the pistachios and sugar into a food processor and let it run for about 45 seconds until the mixture is finely ground. You’re going for something that feels like damp sand, not a paste—and definitely not chunky.
I always use this food processor, it’s got a good, strong motor and three different bowls, so it’s always being used in my kitchen.
If you don’t have a food processor, a high-powered blender can work, but you’ll need to pulse in short bursts and scrape down the sides to keep everything moving. Scoop out two tablespoons of your ground pistachio mixture and set them aside to use later as a topping.
SERIOUSLY GOOD
DESSERTS!
Dessert First is a collection of 61 RECIPES to show you that you can make beautiful, impressive desserts right in your own kitchen, no matter your skill level.
Immediate eBook download. No physical book available.
∙ Lemon Pound Cake
∙ Starbucks Cake Pops
∙ Boston Cream Pie
∙ Chocolate Mousse
∙ Matcha Tiramisu
...and much more!
Includes ad-free recipes like:

Whip the Cream
Grab a large bowl and beat the heavy cream with an electric hand mixer until you see soft peaks form—this is what gives your ice cream base that light and smooth texture. If you overbeat it, it can turn grainy or even separate, which is a big no.
Fold Everything Together
Now take your pistachio-sugar mix and fold it gently into the whipped cream along with the salt, vanilla, and green food coloring if you’re using it. I always use this silicone spatula to scrape every last bit out of the bowl.
The key here is to keep all that air you just whipped into the cream, so you’d want to keep it light and fluffy as much as possible.
Again, no need to whisk it aggressively—a couple of careful turns with a spatula will do the trick.
Churn It
Pour the mixture into your ice cream maker and churn it according to the manufacturer’s instructions—usually about 25 minutes. I always use this ice cream maker, and it never lets me down. I just pop the drum in the freezer the night before, and it’s ready to go. Just make sure you never put ice cream drums in the dishwasher, as it destroys the freezing liquid in the bowl.
When the ice cream is ready, it should be thick, creamy, and scoopable; it won’t be frozen, but that’s the way you want it.
Freeze Until Firm
Spoon your ice cream into a 1-quart freezer-safe airtight container; these are the ones I use, BPA-free, and they don’t crack. If you want more crunch, stir in a handful of chopped pistachios.

Then, smooth out the surface of the ice cream so that it not only looks clean but also freezes evenly.
Press a layer of plastic wrap directly onto the top of your ice cream to make sure no ice crystals form on the surface. Let it firm up in the freezer for 4 to 6 hours.
Scoop and Serve
When it’s nice and firm, scoop it into ice cream bowls or cones. I use this scoop; it’s sturdy, can go in the dishwasher, and I love all the colors you can get it in.
I love these bowls, they’re perfect, and a good size, so many bowls are really small, and it’s a bonus that they look beautiful on the table too!
If you’re serving the ice cream in cones, then this is the holder I use; it always makes a big impression as it looks stunning on the dessert table!
Sprinkle over the reserved pistachio-sugar topping and add a couple of cone wafers on the side for crunch before serving.
That’s it—time to dig in. Enjoy!

Equipment
Ingredients
- 1 cup pistachios raw unsalted
- ¾ cup sugar
- 2 cups heavy cream
- ½ teaspoon salt
- 1 teaspoon vanilla extract
- 1-2 drops green food coloring optional
For the Topping:
- Wafers
Video
Instructions
- In a food processor, blend the pistachios and sugar until finely ground (about 45 seconds). Set aside 2 tablespoons of the mixture for topping.1 cup pistachios raw unsalted, ¾ cup sugar
- In a large bowl, use an electric mixer to beat the heavy cream until soft peaks form. Gently fold in the pistachio-sugar mixture, salt, vanilla extract, and green food coloring (if using).2 cups heavy cream, ½ teaspoon salt, 1 teaspoon vanilla extract, 1-2 drops green food coloring
- Pour the mixture into an ice cream maker and churn according to the manufacturer’s instructions (around 25 minutes). Transfer the churned ice cream to a 1-quart freezer-safe container.
- Stir in extra chopped pistachios if desired. Cover and freeze until firm — about 4 to 6 hours.
- Scoop and top with the reserved pistachio-sugar mix and ice cream wafers.Wafers
Notes
- Use raw, unsalted pistachios: You want clean, nutty flavor without the added salt or roast—trust me, it makes a big difference.
- Don’t overblend: Process just until fine—if you go too far, you’ll start releasing oil from the pistachios, and the texture gets weird.
- Cold equipment helps: Chill your bowl before whipping the cream. It’ll whip faster and hold the texture better.
- Watch for soft peaks: You don’t need stiff cream here—soft peaks will give you the right base texture.
- Fold gently: It might be tempting to stir fast, but a gentle hand keeps the cream airy and light.
- Add the salt: Just a little makes the pistachio flavor pop—it balances out the sweetness perfectly.
- Green color is optional: A drop of green food coloring gives it that classic look, but it’s totally up to you if you want to use it or go for a different color.
- Freeze in a shallow container: A wide, flat container helps the ice cream freeze faster and more evenly than a deep one.
Nutrition
SERIOUSLY GOOD
DESSERTS!
Dessert First is a collection of 61 RECIPES to show you that you can make beautiful, impressive desserts right in your own kitchen, no matter your skill level.
Immediate eBook download. No physical book available.
∙ Lemon Pound Cake
∙ Starbucks Cake Pops
∙ Boston Cream Pie
∙ Chocolate Mousse
∙ Matcha Tiramisu
...and much more!
Includes ad-free recipes like:
Recipe Notes and Expert Tips
I’ve made this pistachio ice cream recipe more times than I can count, and these little tips will help yours turn out great every time.
- Use raw, unsalted pistachios: You want clean, nutty flavor without the added salt or roast—trust me, it makes a big difference.
- Don’t overblend: Process just until fine—if you go too far, you’ll start releasing oil from the pistachios, and the texture gets weird.
- Cold equipment helps: Chill your bowl before whipping the cream. It’ll whip faster and hold the texture better.
- Watch for soft peaks: You don’t need stiff cream here—soft peaks will give you the right base texture.
- Fold gently: It might be tempting to stir fast, but a gentle hand keeps the cream airy and light.
- Add the salt: Just a little makes the pistachio flavor pop—it balances out the sweetness perfectly.
- Green color is optional: A drop of green food coloring gives it that classic look, but it’s totally up to you if you want to use it or go for a different color.
- Freeze in a shallow container: A wide, flat container helps the ice cream freeze faster and more evenly than a deep one.
How to Store Leftovers
Once your ice cream is firm, store it in a lidded freezer-safe container. It’s best within the first few days, when the texture is at its creamiest, but it’ll last for up to 2 weeks.
Let it sit at room temp for 5 to 10 minutes before scooping so it softens just a bit—especially if you’ve stored it in a deep container. Yes, it freezes beautifully, and you can even pre-portion it into small cups if you like grab-and-go servings.
What to Serve With Pistachio Ice Cream
Pistachio ice cream plays well with a lot of things. Try serving it next to a small bowl of fresh raspberries or sliced peaches for something fruity, or add a sprinkle of extra nuts if you want more crunch.
A drizzle of chocolate or caramel sauce takes it over the top, or you can keep it classic with simple wafers or almond cookies. You can even sandwich it between two shortbread cookies or slices of French toast bread for a quick DIY ice cream sandwich—works like a charm.
More Easy Recipes for You to Try at Home
I’ve got plenty more chilled treats that are just as simple and delicious, whether you’re making something cool and creamy or rich and baked.
Can this be used in a Ninja Creami? I don’t own a churner. Thanks!
I’m reluctant to give a definitive answer as I haven’t tried making it in a Creami yet, I will put it on my list of recipes to try.