
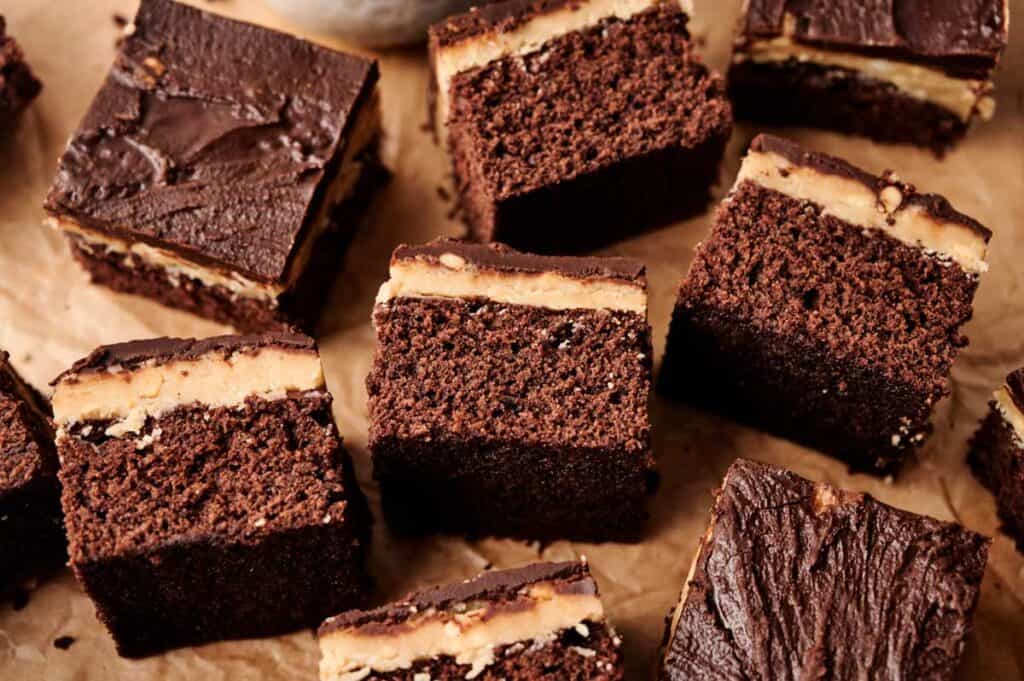
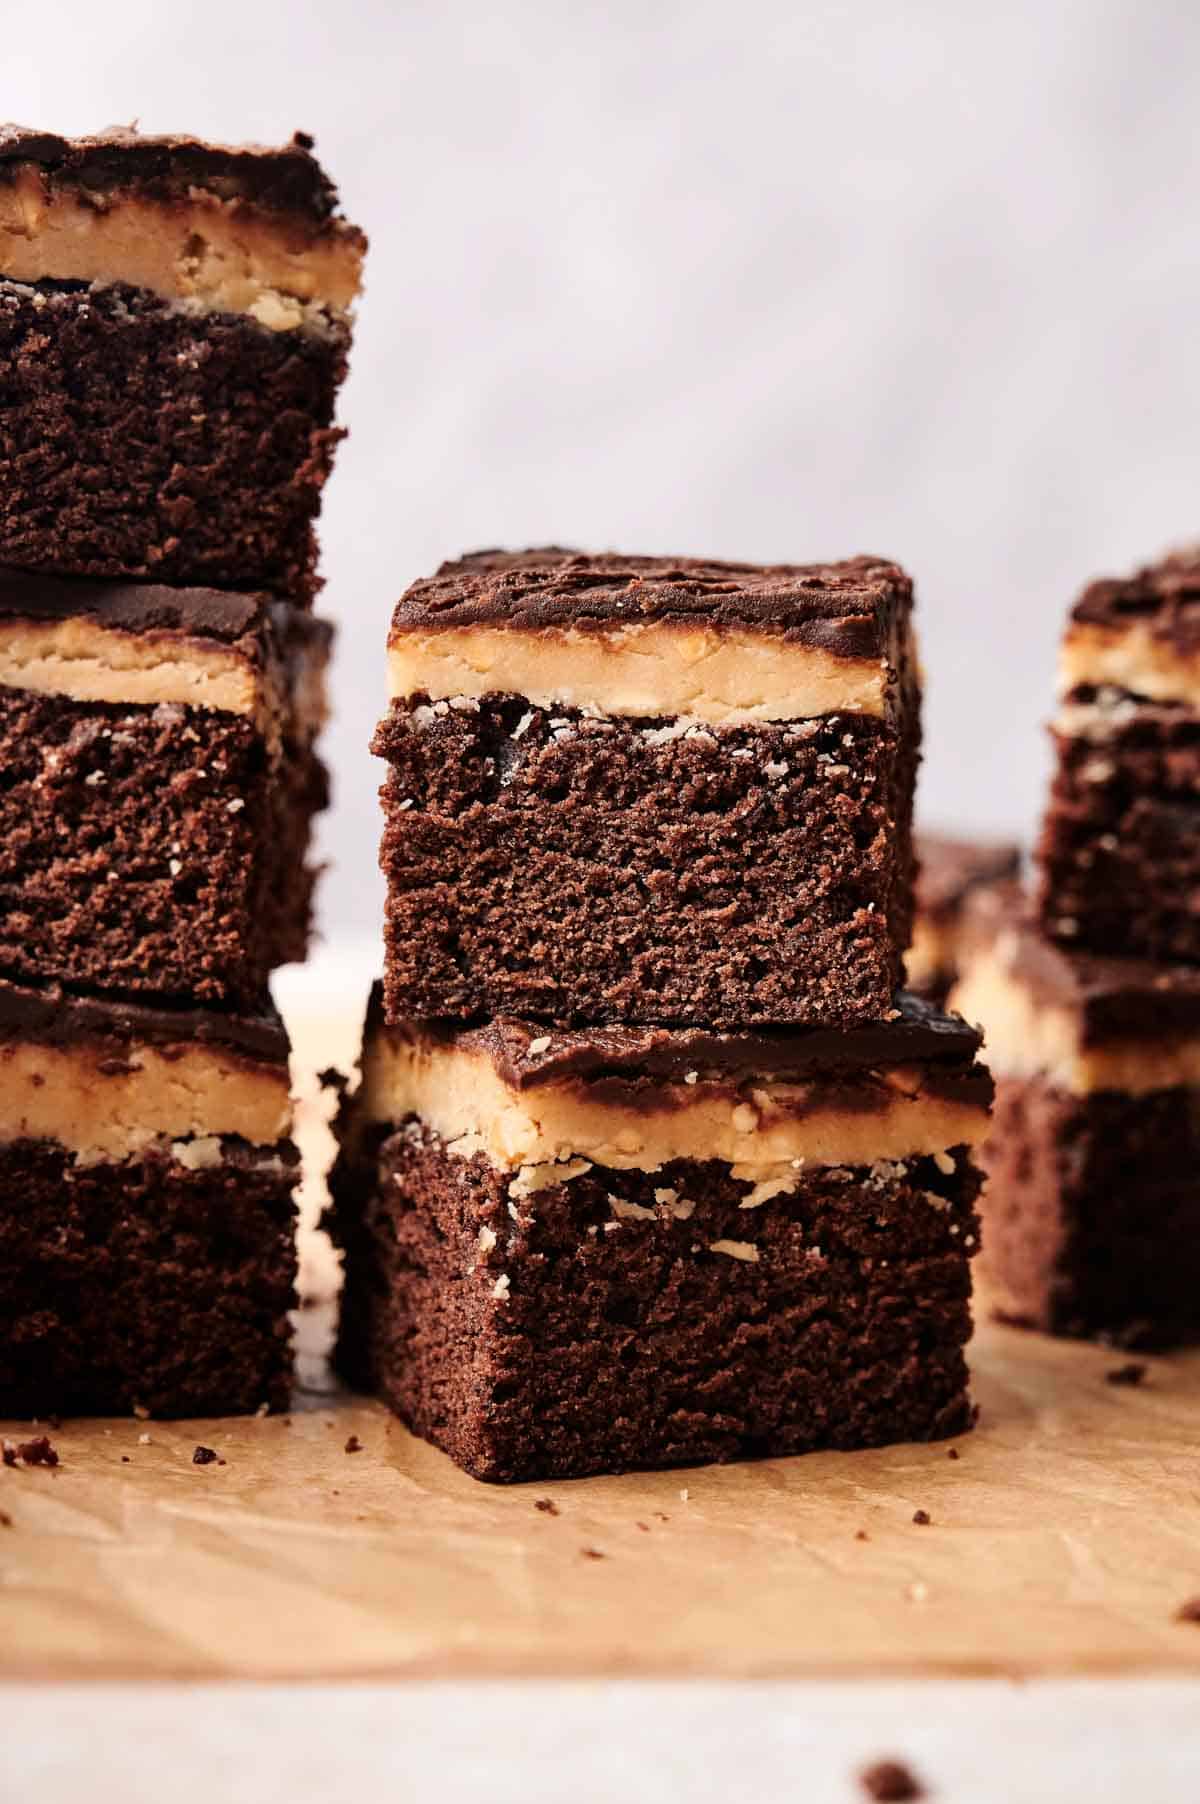
Buckeye Brownies
These buckeye brownies are everything you want in a dessert—fudgy, peanut buttery, and topped with a silky chocolate layer that snaps just right when you bite in. You get the perfect mix of textures: a rich brownie base, a thick peanut butter layer, and that glossy chocolate topping. Great for parties, potlucks, or just a Friday night when you want something sweet without much fuss.
This post contains affiliate links. As an Amazon Affiliate, if you purchase through those links, I earn a commission. Thank you!
This is one of those recipes I keep coming back to because it’s just so good. The peanut butter layer hits that sweet spot between creamy and firm, and the chocolate topping seals the deal. I like baking them in the afternoon so they have time to chill before dessert—or before I sneakily cut a square for myself with my coffee. If you’re into easy layered desserts that taste like a bakery treat, you’ll love this one.
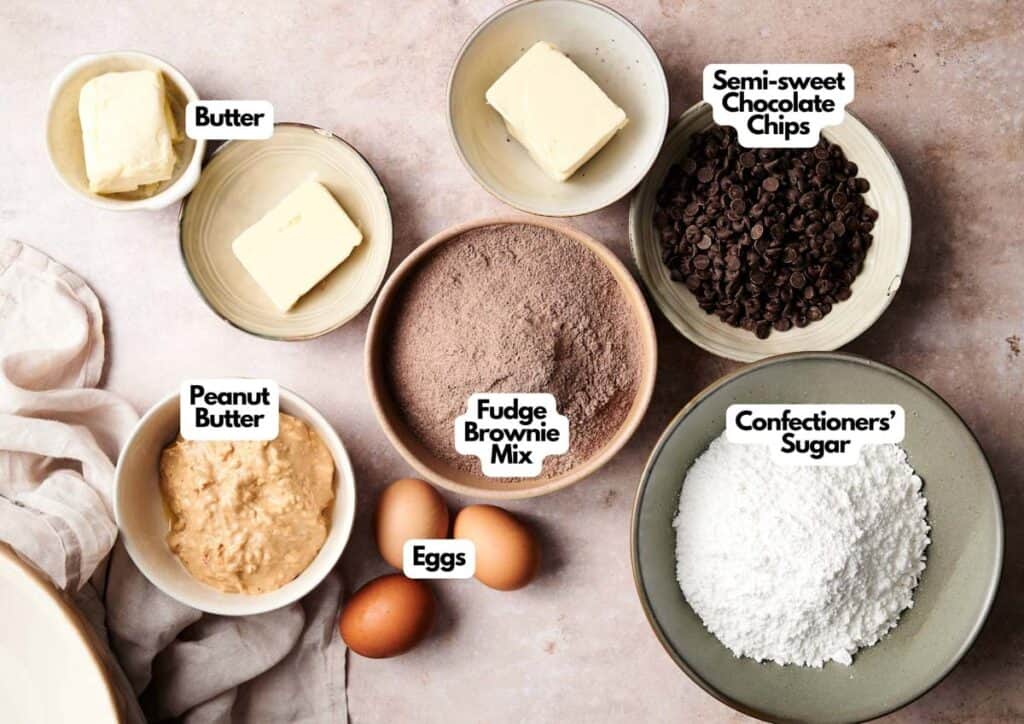
Ingredients You’ll Need
You’ll need all the ingredients shown in the photograph below.
How to Make Buckeye Brownies
I like how easy these buckeye brownies are to pull together. Just a few layers, a little cooling time, and you’re all set for a seriously good treat.
Make the brownie base
Start by preheating your oven and preparing the brownie batter according to your box mix instructions. Pour the batter into a greased 8×8-inch baking pan if you want thick, bakery-style brownies.
For easy cleanup and perfect lift-out squares, I always line the pan with 8×8 precut parchment paper sheets. Total game changer for layered bars like these. Bake as directed, then let them cool completely right in the pan.
SERIOUSLY GOOD
DESSERTS!
Dessert First is a collection of 61 RECIPES to show you that you can make beautiful, impressive desserts right in your own kitchen, no matter your skill level.
Immediate eBook download. No physical book available.
∙ Lemon Pound Cake
∙ Starbucks Cake Pops
∙ Boston Cream Pie
∙ Chocolate Mousse
∙ Matcha Tiramisu
...and much more!
Includes ad-free recipes like:

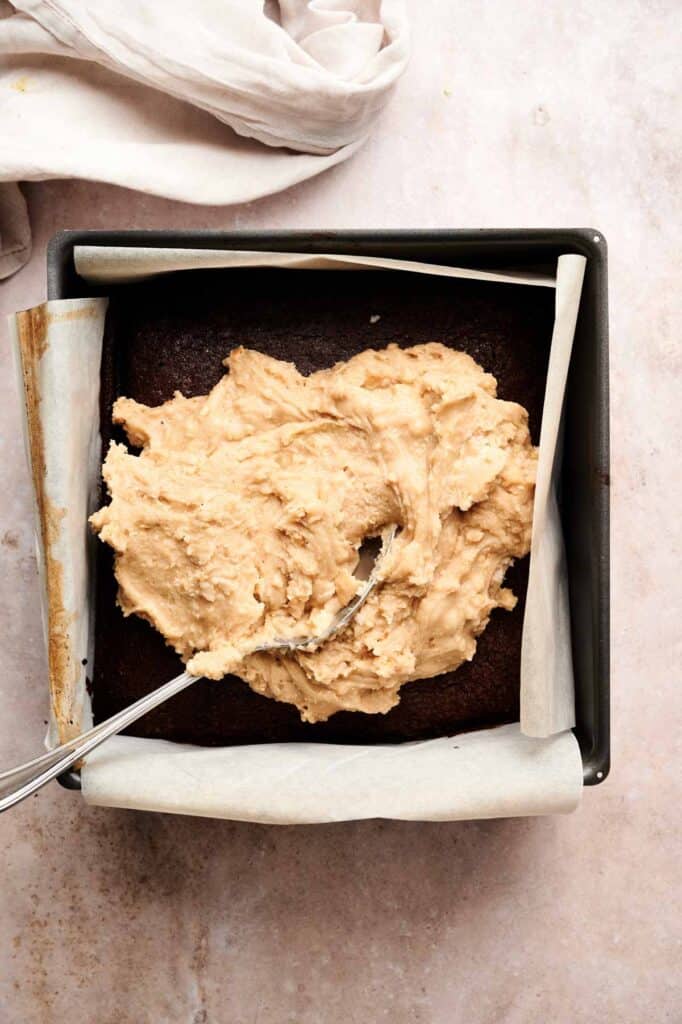
Mix the peanut butter fudge layer
In a microwave-safe bowl, combine the butter with the creamy peanut butter. I like using a glass mixing bowl for this since it goes straight from microwave to counter and it lets me see if everything’s melted properly without stirring too much.
Microwave for about 30–60 seconds, just until melted and smooth. Stir in the powdered sugar until it becomes a thick, creamy mixture. It should spread easily but hold its shape.
Smooth it over the cooled brownie layer using an offset spatula or the back of a spoon. I like using this offset spatula because it spreads evenly into the corners without disturbing the brownie layer.
Make the chocolate ganache topping
In another microwave-safe bowl, melt more butter with your chocolate chips. Heat in 30-second bursts, stirring in between, until glossy and smooth. Pour this right over the peanut butter layer, spreading it gently so you don’t mix the layers.
This is when my silicone spatula comes in handy—it spreads that warm ganache smoothly without dragging or tearing into the peanut butter layer.
Chill and slice
Pop the whole pan in the fridge for 30–60 minutes, just until the chocolate is set. Once chilled, slice into squares. A warm knife makes cleaner cuts, but let’s be honest, messy brownies still taste amazing.
If you’re packing these up for a potluck or party, I use a container with a lid to keep the layers intact and then slide it into this insulated carrier so the chocolate stays set even if you’re traveling for a bit.
Equipment
Ingredients
For the Brownie Mix:
- 1 package fudge brownie mix
- 3 eggs
- ½ cup butter
For the Buckeye Brownies:
- ½ cup butter plus 6 tablespoons butter divided
- 1 cup creamy peanut butter
- 2 cups confectioners’ sugar
- 6 ounces semisweet or dark chocolate chips

Video
Instructions
- Preheat your oven and prepare the brownie batter according to the package directions.1 package fudge brownie mix, 3 eggs, ½ cup butter
- Pour into a greased 8×8-inch baking pan (for extra-thick brownies) or use the recommended size. Bake as directed and let the brownies cool completely in the pan.
- In a microwave-safe bowl, combine ½ cup butter and peanut butter. Microwave for 30–60 seconds until the butter is melted.½ cup butter plus 6 tablespoons butter, 1 cup creamy peanut butter
- Stir in the confectioners’ sugar until the mixture is smooth and thick. Spread evenly over the cooled brownies.2 cups confectioners’ sugar
- In another microwave-safe bowl, combine 6 tablespoons of butter and the chocolate chips. Microwave in 30-second intervals, stirring in between, until fully melted and smooth.6 ounces semisweet or dark chocolate chips
- Pour the chocolate over the peanut butter layer and gently spread into an even layer. Refrigerate for 30–60 minutes, or until the chocolate is set.
- Slice into squares and enjoy!
Notes
- Brownie thickness: Use an 8×8-inch pan for thick layers or a 9×13 if you want thinner bars.
- Peanut butter: Stick with creamy, shelf-stable peanut butter like Jif or Skippy. Natural peanut butter can separate and won’t hold the shape as well.
- Room temp ingredients: Let your eggs and butter come to room temperature before mixing. This makes everything blend more smoothly.
- Don’t skip the cooling: If the brownie layer is warm, the peanut butter mixture will melt and slide.
- Easy spreading: A small offset spatula helps spread each layer neatly without disturbing the one underneath.
- Cleaner cuts: Chill the brownies well and use a sharp knife. Wipe between cuts if you want those perfect squares.
- Easier removal: Line the pan with parchment paper before baking to lift the whole thing out for easier slicing.
- Make ahead: They’re actually better after chilling, so making them a day ahead is perfect.
- Homemade brownies: You can use your favorite homemade brownie recipe if you prefer.
Storage Instructions
- Room temperature: Once the brownies are set and sliced, store them in an airtight container. You can keep them at room temperature for up to 3 days.
- Fridge: If you want to keep them longer, store them in the fridge for about a week. They’ll be a little firmer but still delicious.
- Freeze: They also freeze well. Just wrap each square in parchment or plastic wrap, then pop them in a freezer bag. Thaw in the fridge or at room temp when the craving hits.
Nutrition
SERIOUSLY GOOD
DESSERTS!
Dessert First is a collection of 61 RECIPES to show you that you can make beautiful, impressive desserts right in your own kitchen, no matter your skill level.
Immediate eBook download. No physical book available.
∙ Lemon Pound Cake
∙ Starbucks Cake Pops
∙ Boston Cream Pie
∙ Chocolate Mousse
∙ Matcha Tiramisu
...and much more!
Includes ad-free recipes like:
Recipe Notes and Tips
I’ve got a few little tricks to help your buckeye brownies turn out just right:
- Brownie thickness: Use an 8×8-inch pan for thick layers or a 9×13 if you want thinner bars.
- Peanut butter: Stick with creamy, shelf-stable peanut butter like Jif or Skippy. Natural peanut butter can separate and won’t hold the shape as well.
- Room temp ingredients: Let your eggs and butter come to room temperature before mixing. This makes everything blend more smoothly.
- Don’t skip the cooling: If the brownie layer is warm, the peanut butter mixture will melt and slide.
- Easy spreading: A small offset spatula helps spread each layer neatly without disturbing the one underneath.
- Cleaner cuts: Chill the brownies well and use a sharp knife. Wipe between cuts if you want those perfect squares.
- Easier removal: Line the pan with parchment paper before baking to lift the whole thing out for easier slicing.
- Make ahead: They’re actually better after chilling, so making them a day ahead is perfect.
- Homemade brownies: You can use your favorite homemade brownie recipe if you prefer.
How to Store Leftover Buckeye Brownies
Once the brownies are set and sliced, store them in an airtight container. I’ve been using these stackable airtight food containers that fit perfectly in the fridge without smushing the ganache layer. They seal tightly, so nothing dries out or absorbs other fridge smells.
You can keep them at room temperature for up to 3 days, or in the fridge for about a week if you like them a little firmer. They also freeze well. Just wrap each square in parchment or plastic wrap, then pop them in a freezer bag.
I like this plastic wrap because it clings tightly and doesn’t peel up in the fridge. For freezing, these durable freezer bags are my go-to—they’re thick, zip easily, and keep the brownies fresh without freezer burn.
Thaw in the fridge or at room temp when the craving hits.
Our Top 3 Money Saving Tips for This Recipe
Here are some budget-friendly tricks to keep your buckeye brownies sweet and affordable:
- Brownie mix: Use a store-brand boxed brownie mix instead of a name-brand version.
- Chocolate chips: Replace semi-sweet chocolate chips with whatever chocolate you have on hand.
- Peanut butter: Buy peanut butter in bulk or during sales—it keeps well.
What to Serve With Buckeye Brownies
These buckeye brownies are rich on their own, but if you want to level things up, serve them with a scoop of vanilla or pistachio ice cream or a drizzle of warm chocolate sauce.
They also go great with coffee, cold milk, or a creamy latte. For parties, pair them with salty snacks like pretzels or popcorn for that sweet-salty balance everyone loves.
More Peanut Butter Recipes You Will Love
I’ve got more sweet treats where these came from. If you’re into easy desserts with big flavor, try one of these next: